FreePBX at Home - Part 2
Part 2 of the Home PBX Project! This time we look at connecting our PBX to our PSTN analogue phone line with the Grandstream HT503 ATA.


Part two of my project was to add the ability to make and receive calls using the analogue phone line in our house. This is helpful for receiving local calls with an Irish phone number, as it's uncommon to get reasonably priced Irish numbers via SIP trunks. With the right adapter, we could also use our DECT phone. It has a range of about a kilometer, so it works well anywhere near our home!
Using a local deals website, I found a Grandstream HT503 that was a few minutes drive from here. The HT503 is an ATA, Analogue Telephone Adapter, and is used to connect analogue telephone networks or handsets to a VoIP system. The HT503 has two network ports and two RJ11 ports - 1 x FXO and 1 x FXS.
When choosing an ATA to connect your PBX to the telephone network, it's important to get a device with an FXO port for analogue line connection, as a good majority have only FXS for connecting phones to a VoIP system.
An FXO (Foreign Exchange Office) port is used to connect our HT503 to our analogue telephone line. When configured, inbound calls via the FXO port will be routed to the PBX, then outward to extensions or a ring group. Similarly, with an outbound route, we can route outbound calls via the FXO and therefore the analogue line.
The FXS (Foreign Exchange Subscriber) port will be used to connect to an old DECT phone we previously used in the house. We will look at setting up the FXS port as an extension on our PBX. That means we can call the extension for the DECT phone, or we can have it ring with all other phones with an incoming call. Similarly we can make outbound calls using this handset too.
One (ongoing) problem I have with my HT503 is the lack of incoming Caller ID, so this won't be covered in this guide. It's not being detected by the ATA, so isn't being sent to the PBX.
Connecting the HT503
I recommend completing a factory reset on your HT503 when you receive it. These devices have some advanced settings which can affect calls and the interface to your PBX - these could be easily missed during the setup, so a factory reset will have you back to the start. To do this, unplug the Ethernet cable, press the reset button for 'about' 7 seconds (I had to wait 15s).
When you start up the HT503, connect your computer directly to the LAN port. As default, the HT503 is configured as a DHCP server. The default IP address of the HT503 when connected to LAN is http://192.168.2.1, and the default password is 'admin'.
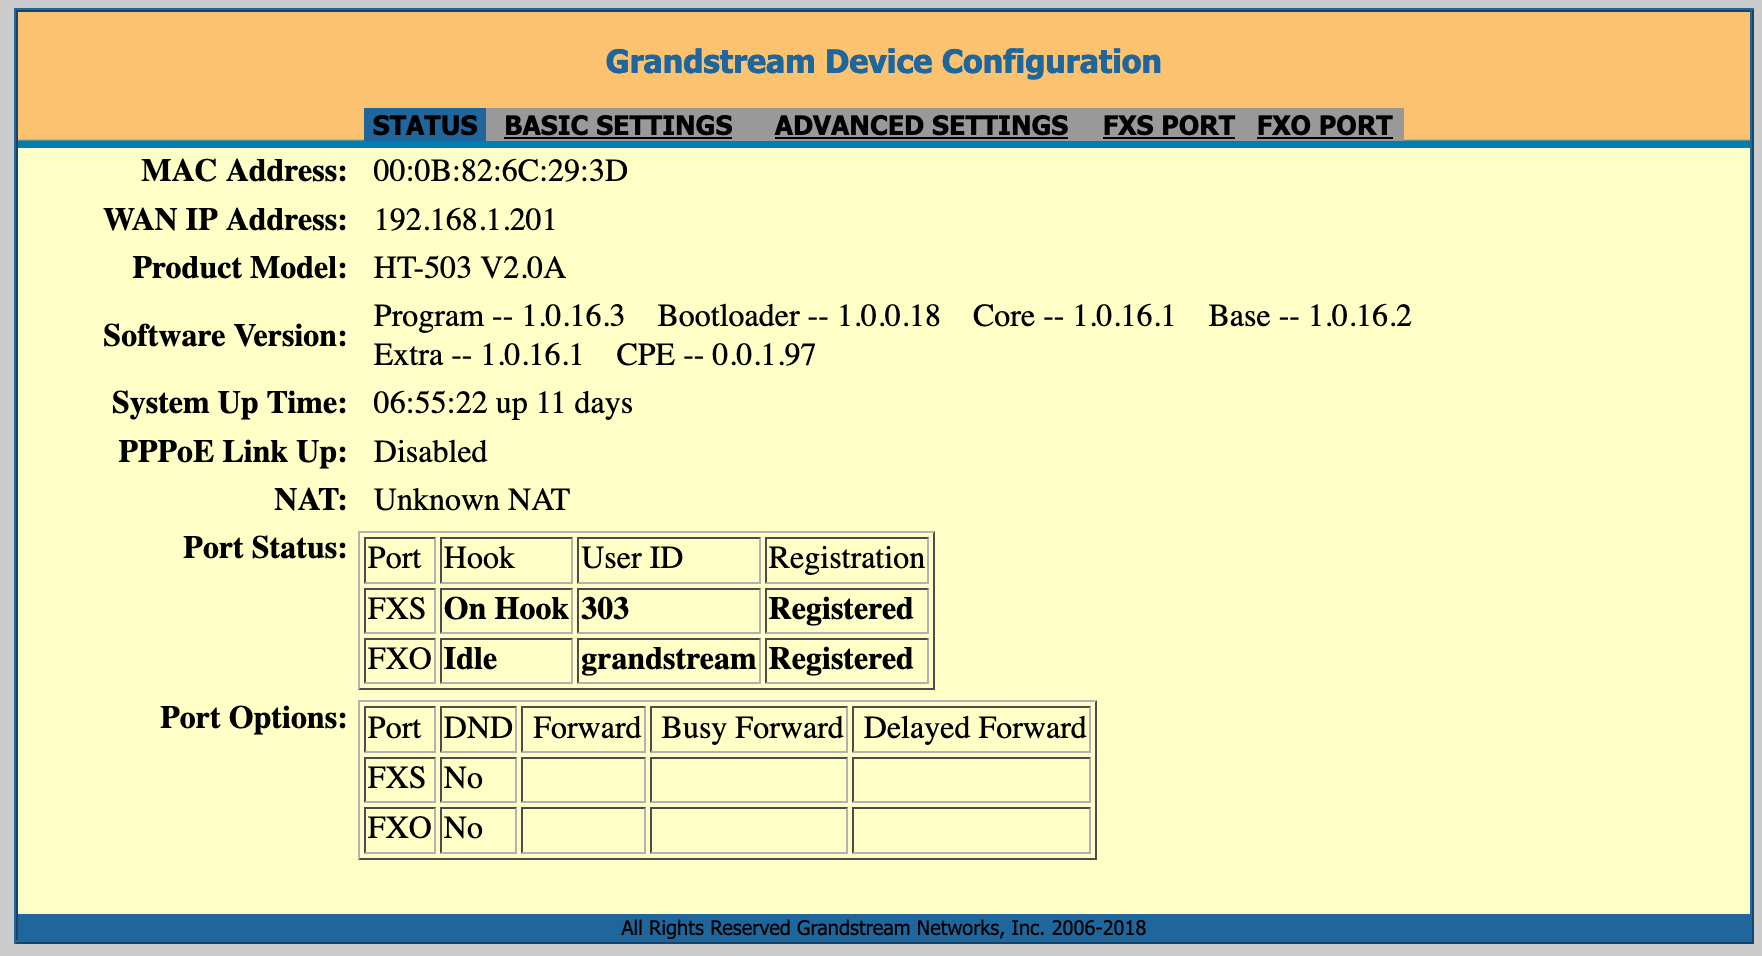
When you have everything reset, you can connect your telephone line to 'line' and the phone handset to 'phone'.
When inside the web server, you should set a static IP address in the Basic Settings tab. Note this is the WAN set-up, and we'll use the WAN port to connect to our PBX system via the network. I set my IP like below;
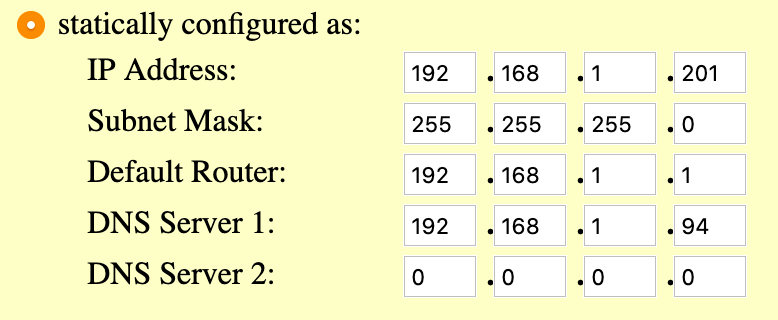
I also set the device mode to Bridge, so there were no DHCP issues on my network.

You should update & apply the settings at this stage. You may need to wait a few minutes before the connection returns.
At this stage, you can plug a cable from the WAN port to your network - note that as we make changes, your HT503 may be 'banned' by Fail2Ban on FreePBX.
I recommend you add the IP you have set to the whitelist on Fail2Ban.
To do this, go to your FreePBX, Admin > System Admin > Intrusion Detection. Add the IP to the whitelist. Press 'Submit', and then 'Restart' Intrusion Detection at the top of the tab.
Firmware update
The research I have done on the HT503 seems to suggest that the latest version of firmware tends to have fewest bugs. I had assumed that I was using the latest firmware, but I was not!
My factory reset HT503 shows that the firmware update server is 'fm.grandstream.com/gs' and using 'HTTP' protocol. Even though 'Always Check for New Firmware at Boot up' was enabled, it didn't update or provide a hint that an update was available.
I have not tested this, but once your HT503 has an internet connection, try to change the firmware update server to 'firmware.grandstream.com' and reboot.
The method I followed to update the firmware used the TFTP server built in to OSX.
- Download the firmware file for the HT503 from firmware.grandstream.com and save it in '/private/tftpboot'
- Set the IP of the OSX machine as the firmware server path & config server path.
- Run the commands below
- Reboot the HT503
sudo launchctl load -F /System/Library/LaunchDaemons/tftp.plist
sudo launchctl start com.apple.tftpd
This will run the update and reboot the ATA. If you haven't been using the latest firmware and an update was required, you may need to update update the WAN IP as we did above.
More info on the OXS built in TFTP server can be found via this link.
Advanced Settings
Once the connection has returned & you can connect to the HT503, progress to the Advanced Setup page.
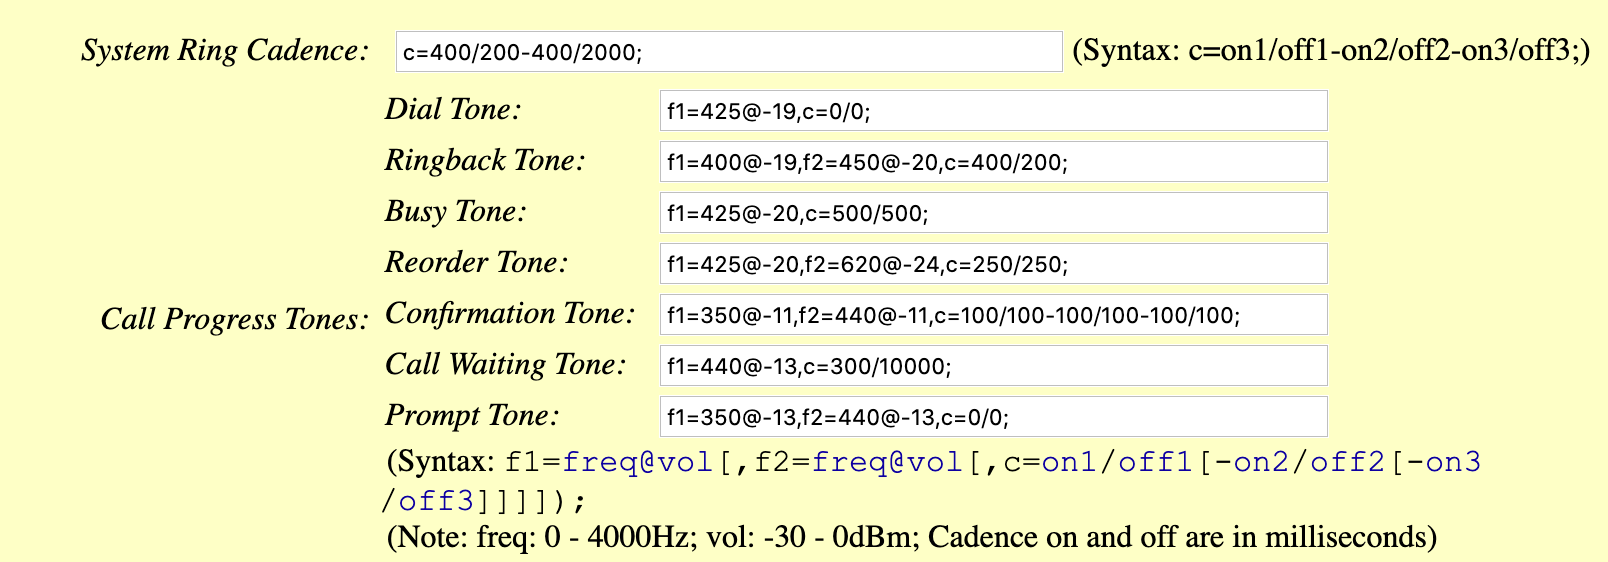
I made very few changes to the Advanced page, but you should change the System Ring Cadence & Call Progress Tones to those used in your country. These are used by the HT503 to detect dial tone, busy tone, etc.
The Ring Cadence is the ring tone. You can find most European tones in this document. The UK & Ireland cadence example is 400 milliseconds ring / 200 milliseconds silent /400 milliseconds ring / 2 000 milliseconds silent. This is described as two short bursts followed by a single short pause.
Call Progress Tones aren't necessarily the easiest to find on the web - some people will even charge a subscription fee for a list of them (crazy!) - but you could just download a world-wide list of tones for free using this PDF from ITU.
Setting up the FXO port
Now we have the ATA updated and ready, we'll configure the FXO first - it's the trickier part to get working. Remember the FXO is going to connect our PBX to the analogue phone line.
First off, make sure you have the cable connected to your phone line.
Next, we will create a Trunk in FreePBX.
This will connect the ATA to the PBX, and allow us to create an Outbound Route using the ATA as a trunk. We are going to add a pjsip trunk.
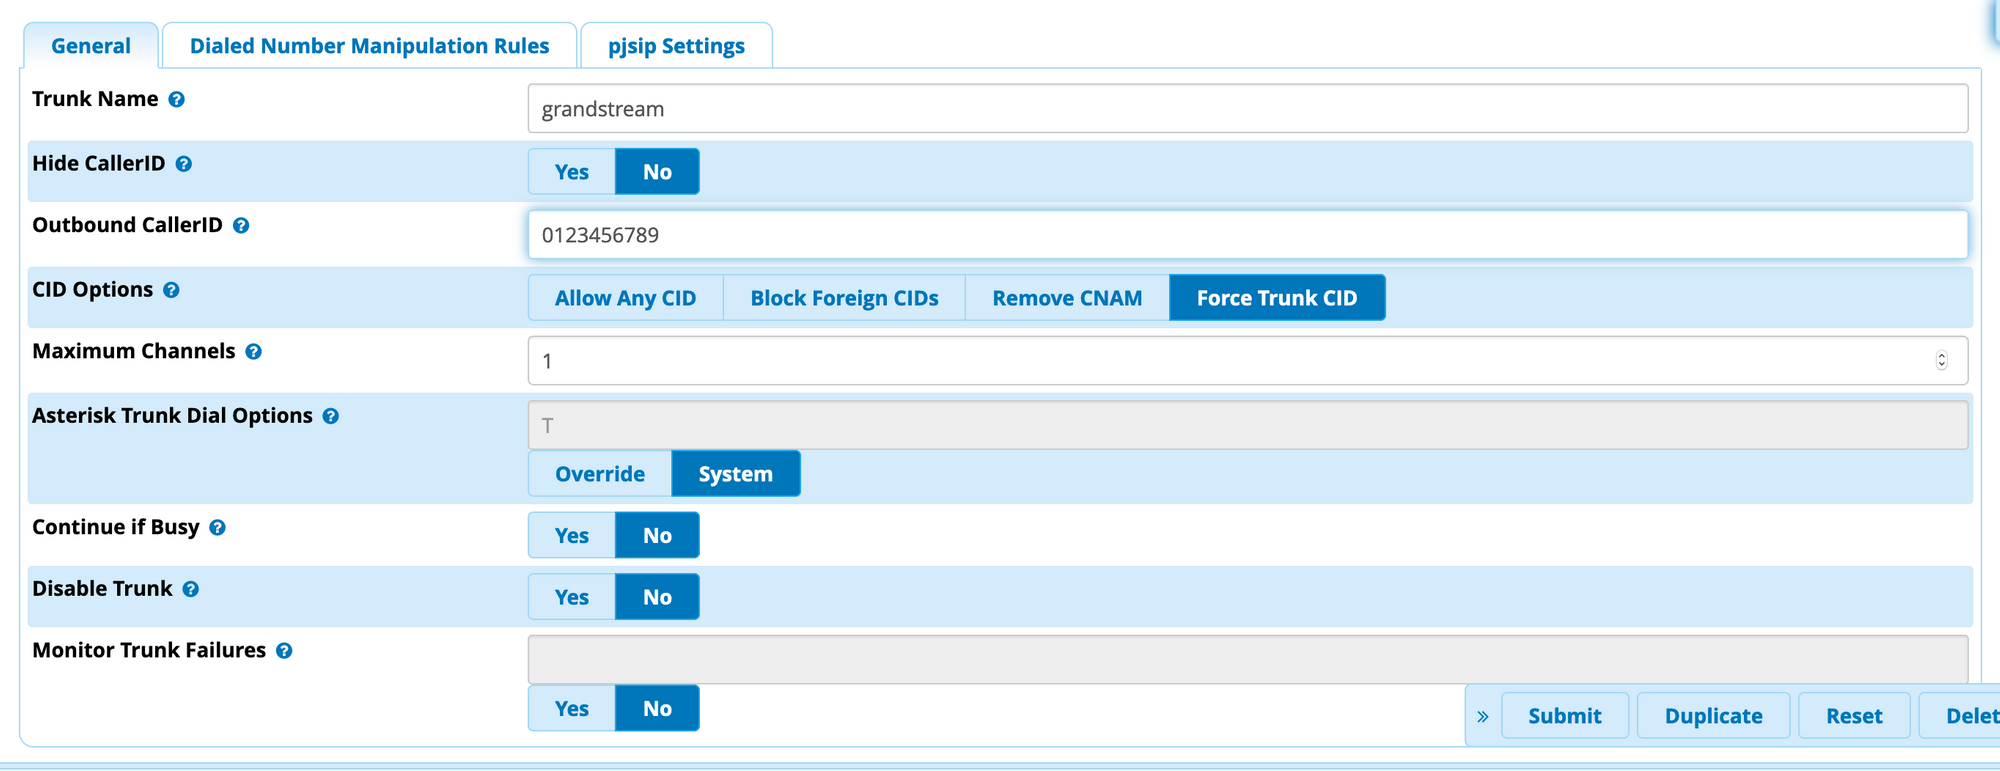
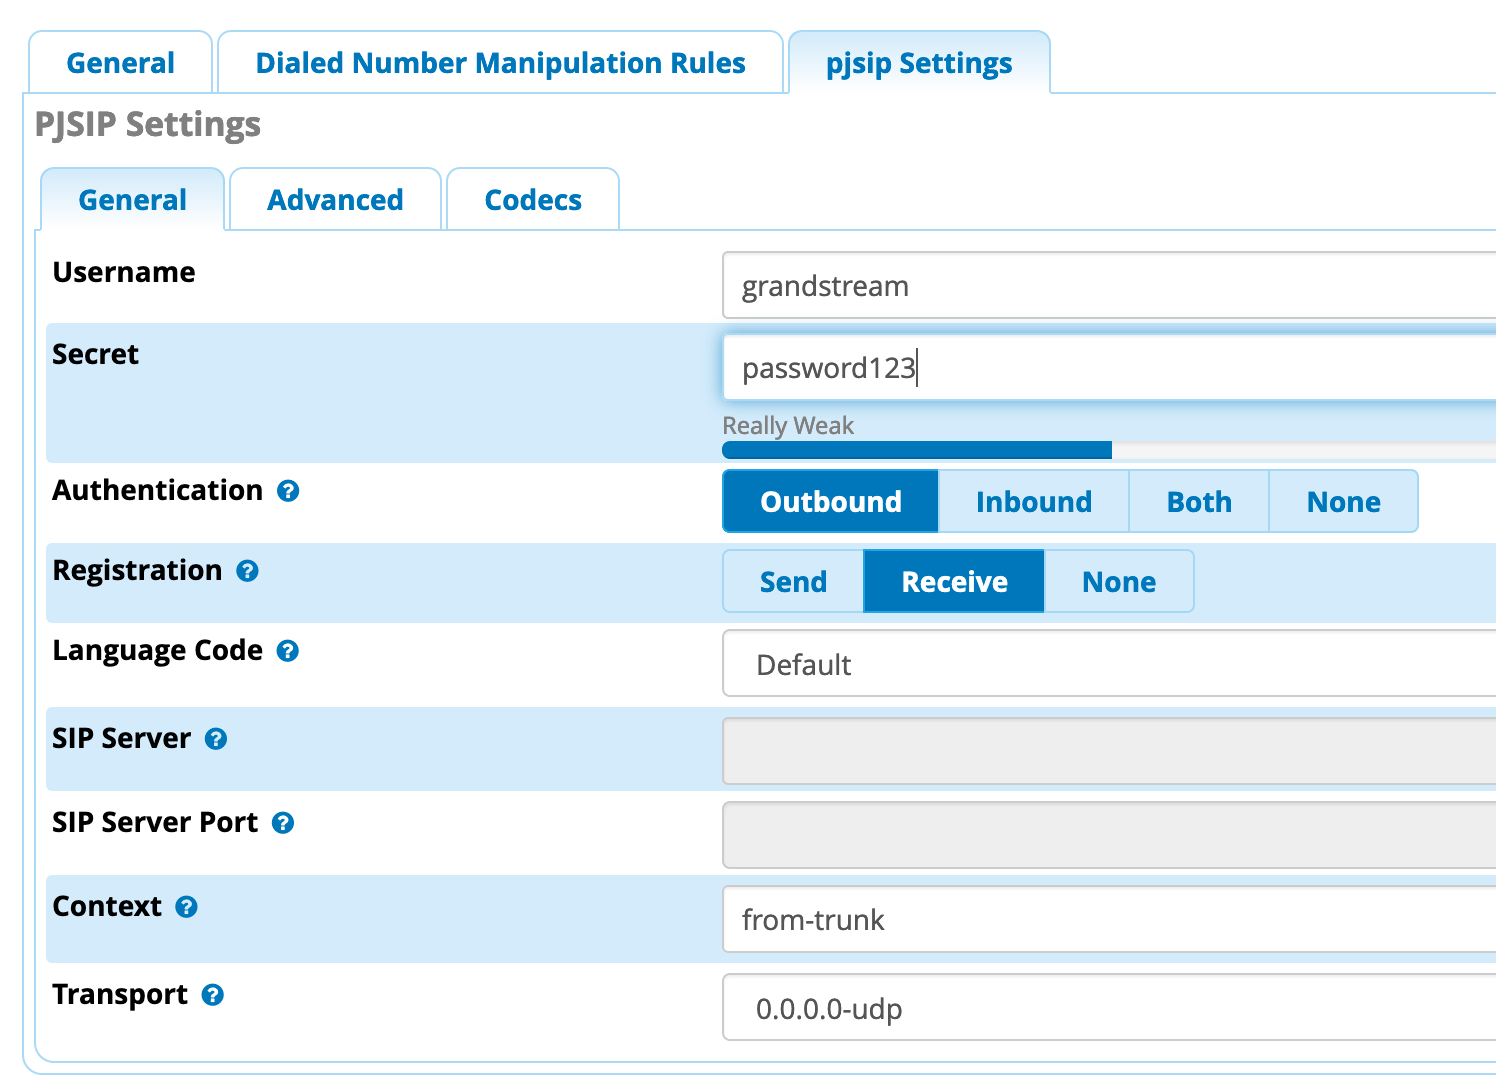
You can give the trunk any name you like and any CID (your PSTN probably doesn't support changing the outbound CID). I would suggest setting max channels to 1, as your line likely supports only one concurrent call.
Under pjsip settings, you can assign a username & secret. I have used a weak password as the HT503 (apparently) has a hard time with complex secrets. My PBX won't ever be exposed outside of my LAN, so this is a risk I'm willing to take. Do not follow my advice if it puts your system as risk.
I have set 'registration' to 'receive', as the PBX will receive a registration attempt from the HT503.
You can now Submit & Apply Config.
Now we can set up the HT503! Please note these settings applied to my installation, using a telephone line in Ireland. Your mileage may vary, and different settings may be required.
In the FXO Tab, intially disable the account, until the settings are complete.
Set up the Primary SIP server (with port) as required. I opted for the IP address of the FreePBX server rather than the hostname. Copy & paste the IP to the Outbound Proxy.
Add the trunk username and password you set in FreePBX into the fields as below. The 'Authenticate Password' isn't shown on any HT503 web page for security reasons.

I set the SIP registration to Yes and that the HT503 should unregister itself from the PBX when it reboots.
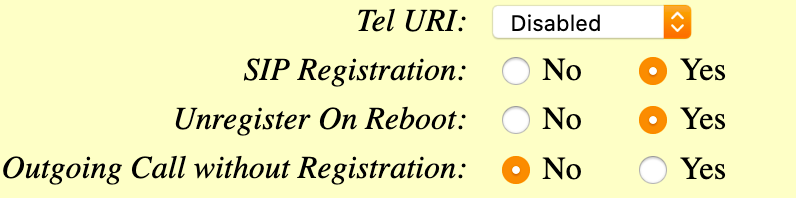
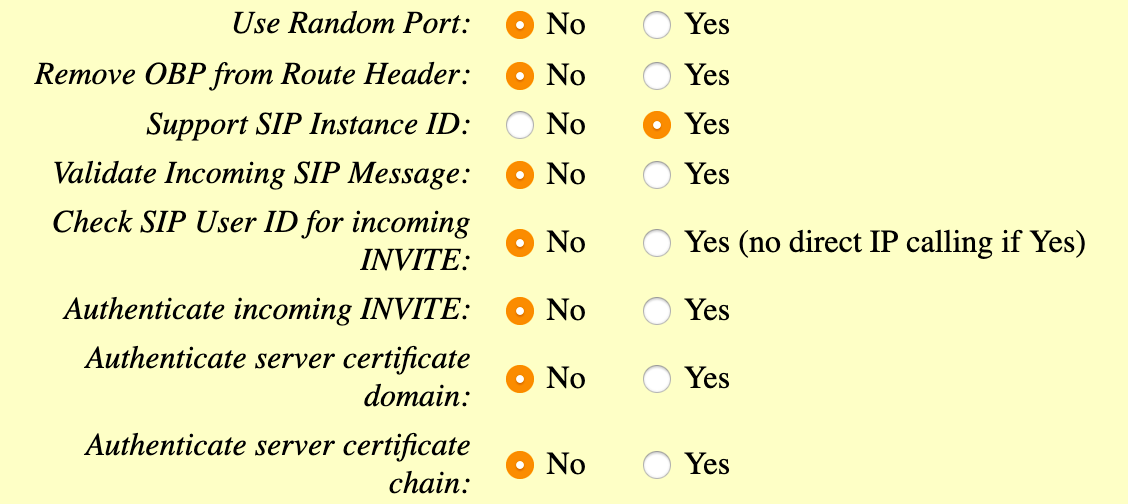
I don't believe I changed many of these settings, but if you want to mirror my setup, here's what they look like;
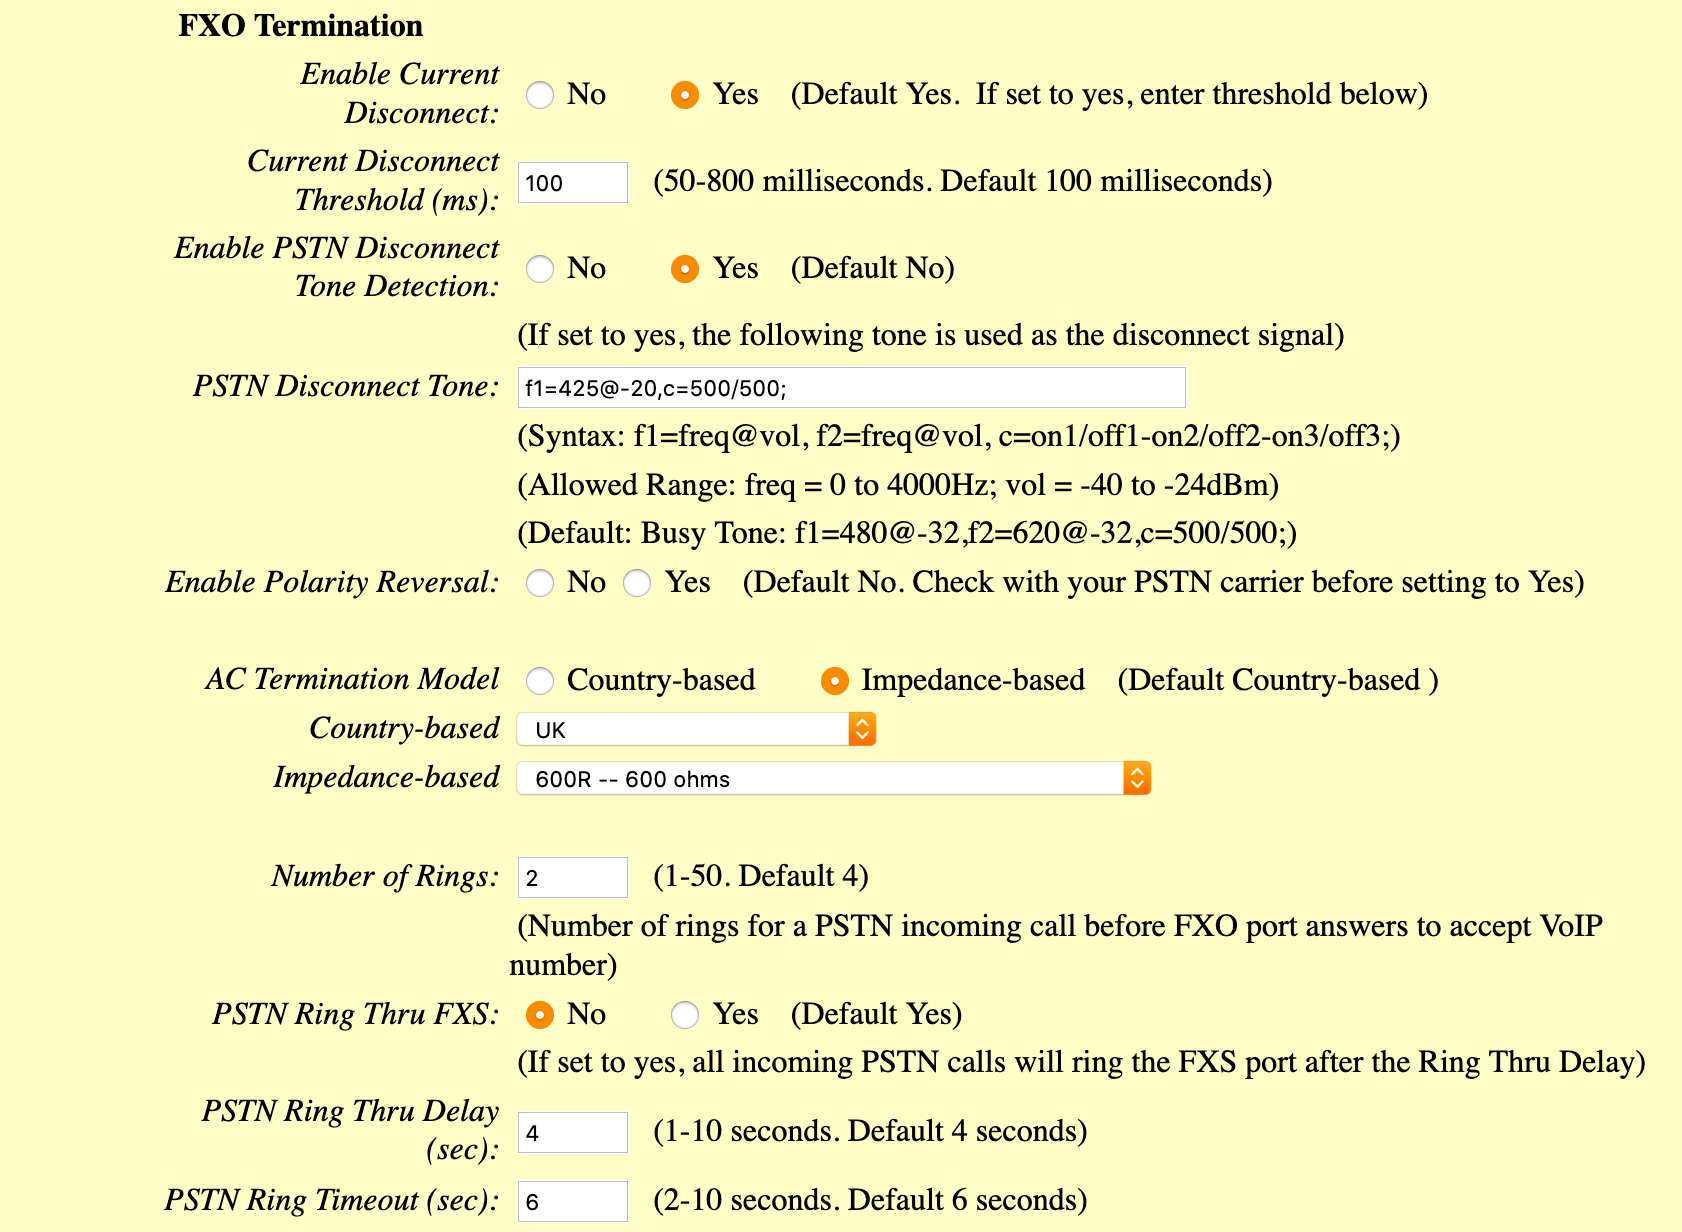
Towards the bottom of the page, you'll find the FXO termination information. I have included the PSTN disconnect tone, which is the same (in my case) as the busy tone.
When I had managed to get the FXO trunk connected to the PBX, I would always get an error 'All circuits are busy'.
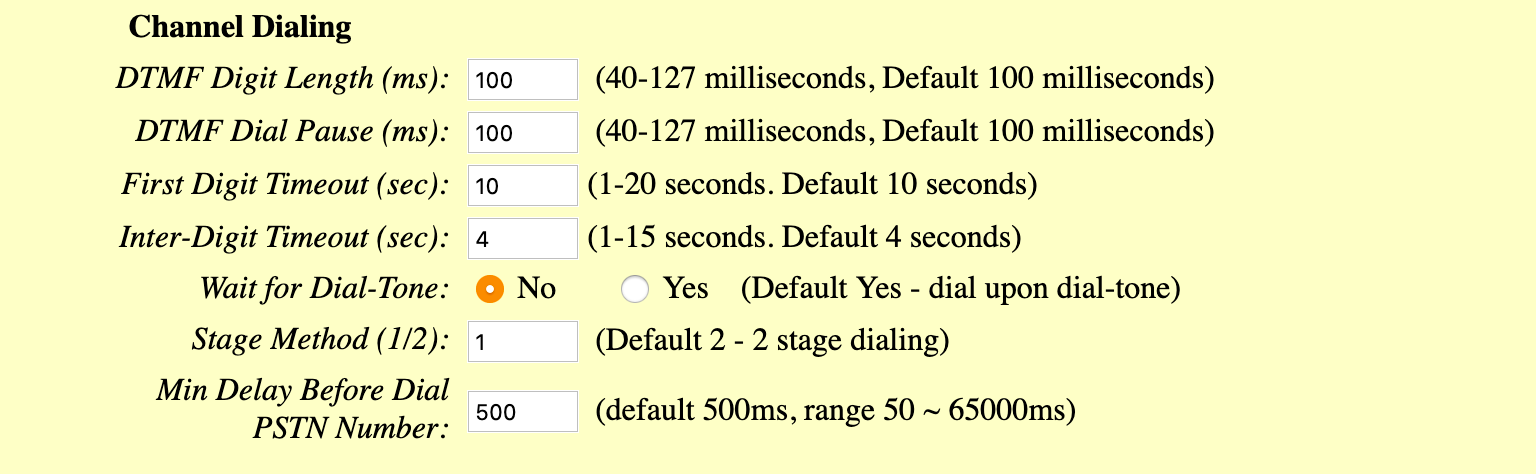
I spent a lot of time trying to make the FXO dial out via the PSTN - this was rectified by a number of steps - not waiting for a dial tone & using a 1 stage dial method. You'll find these in the Channel Dialling setup at the bottom of the page.
Secondly, I had incorrectly set the AC Termination. When I was listening to the line I could hear an 'echo' when it was trying to dial out. This was because I had set 'UK' country-based Termination.
I then tried 270Ω + ( 750Ω || 150 nF ), as per CTR21. This worked but still wasn't great. Some more research got me pointed in the right direction, which was to use 600Ω. Outbound calls were now dialling perfectly!
Now we can create an outbound route, allowing the PBX to route calls to the HT503.
The setup is basic, just the route name and CID, plus the trunk sequence set to your grandstream trunk you created earlier.

In dial plans, I created a rule that allows calls with the prefix '7'. Because the PSTN doesn't need any number manipulation (except removing the number 7), we don't need to do much else on the rule.

Give it a go... you should be able to dial out by prefixing your number with 7!
Once you're happy with everything, you can change this prefix to anything you want. I just use a number like 7 or 8 for testing out the trunks & rules, so I know it's not a conflict causing the error.
Inbound calls using the FXO port
Getting incoming calls to route through to your PBX system is much easier than setting up the outgoing calls!
On the basic setup page, you can add a user ID (extension), and your SIP server and port to ring when an incoming call is made. I have set up extension 401, which is a ring group. This ring group calls my desk phone, my mobile extension and the FXS extension. We'll look at that later!
You could use the extension we created in part 1.

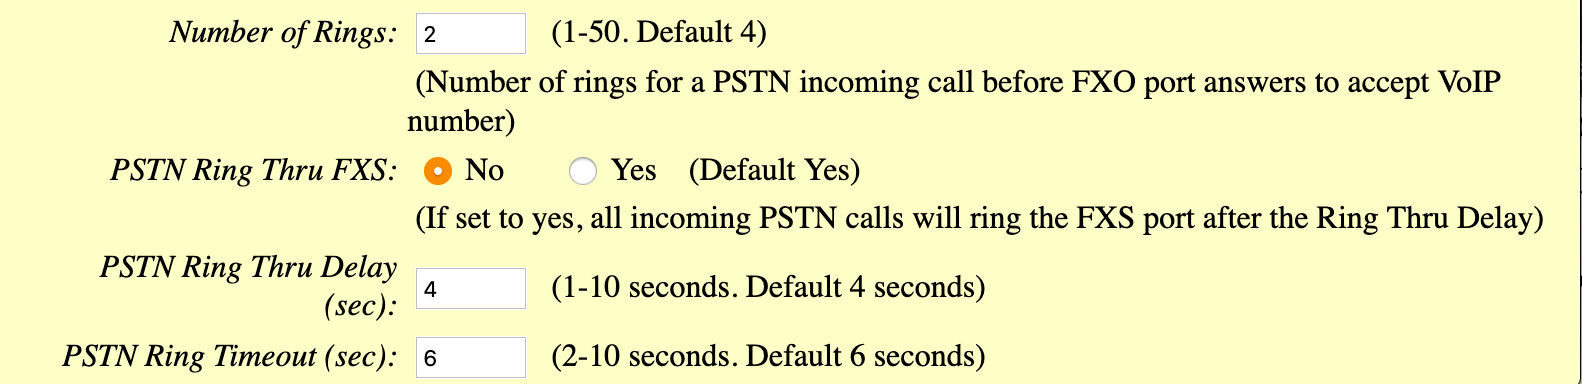
A number of settings can be customised in the FXO settings - how many time the PSTN should ring before the call is forwarded to the PBX, and if it should ring the FXS directly. I selected this to No, as we will do this ourselves via FreePBX.
The number of rings should be left at 2 (minimum), so the Caller ID can be passed to the PBX - if you can get it to work!
Now we have calls being piped from the HT503 to the PBX, we need to make sure that the PBX knows how to handle the inbound call. We do that by going to Connectivity > Inbound Routes.
When we add a new inbound route, we can just add a description & where we want to route the call - known as the destination.
We are going to start off by using the extension we created in part 1, ext 320. Set the destination to 'Extension', then choose the Extn you want to ring with inbound calls. Be sure to check the other settings, but for now we don't need to make any changes.

We will look later at Ring Groups. These come in handy when you want to ring more than one extension with an inbound call.
Setting up the FXS port
Now we have the FXO taken care of, let's look at the FXS port. I have mentioned that we can use this port to make use of an old phone, but route the calls via the PBX. In my case, I use a BT Elements 1K DECT phone with the PBX.
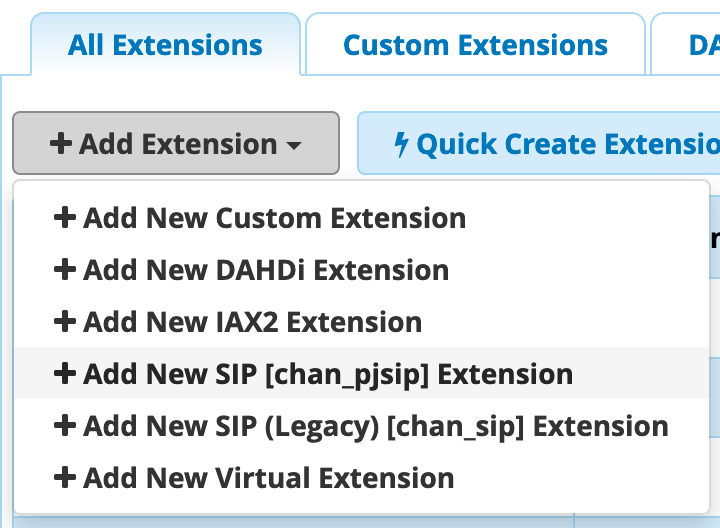
First of all, we will set up an exetension for the FXO port. That means we can call internally using the extension number & we can make and receive calls outside the PBX. Following the same steps in Ext 320, add a new chan_pjsip extension.
Give your new extension a name. I went with Handheld because it's a DECT phone. The same rules apply here for the secret, try sticking with letters and numbers. I did not assign a user, voicemail or find me/follow me to the handheld device. Once you have checked all the settings are as you like, Submit & Apply Config.
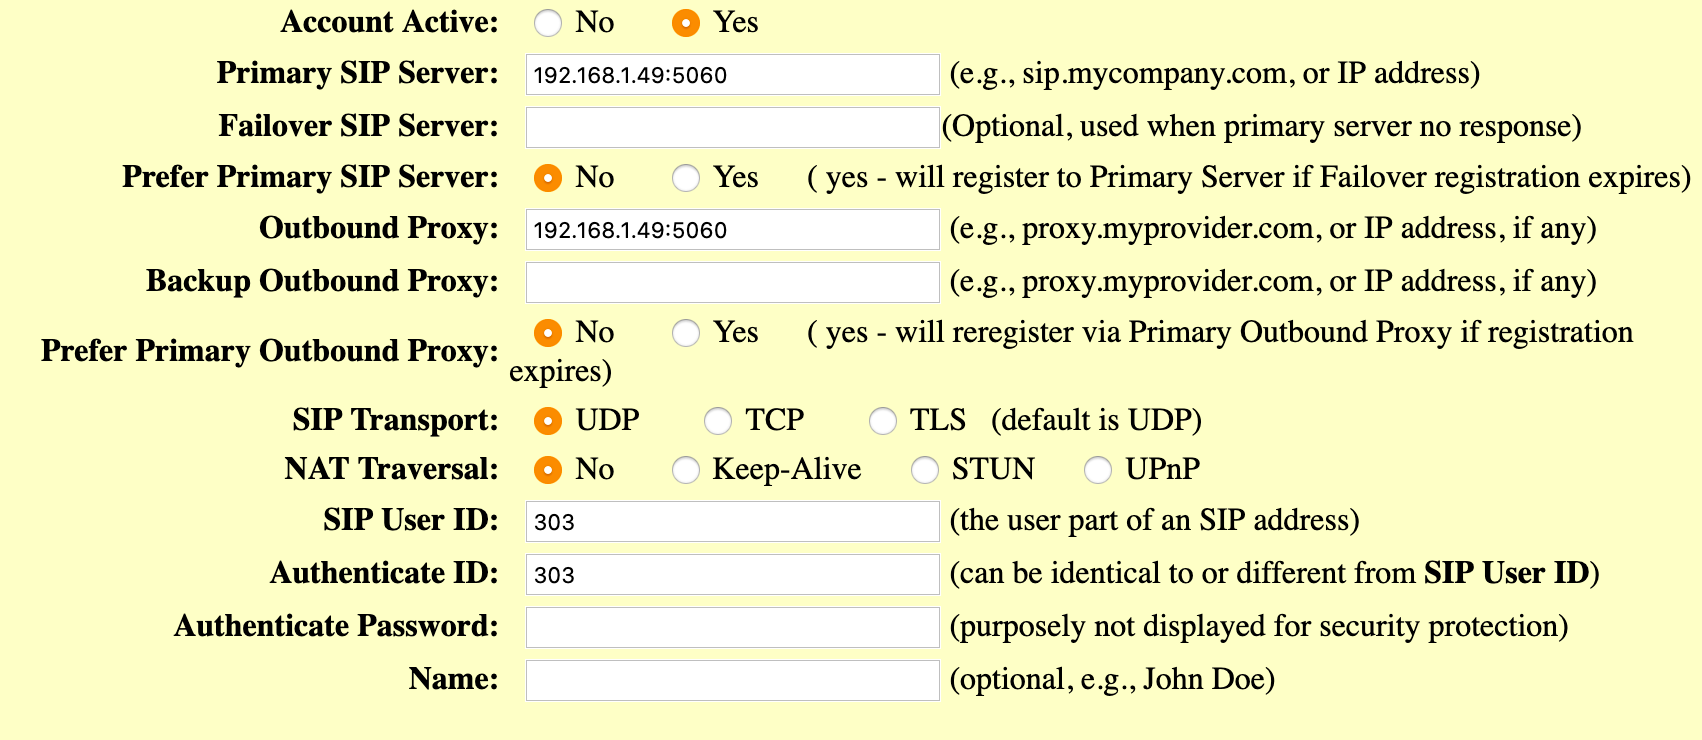
Now, log in to the HT503 again, and go to the FXS tab. This tab is similar to the FXO.
We want to fill in the SIP server, Proxy, SIP User ID, Auth ID & Password.
Once you have checked the remaining settings, update & apply the configuration. Now, try to ring your new FXO extension from your softphone - the phone should ring!
If you think you are having issues with the FXS and want to make a call directly to the analogue line (FXO), just dial *00 from the handset you have connected. You should hear a dial-tone!
Not going to plan? Logging the HT503 & FreePBX Logs
HT503 Syslog
Logging from the HT503 isn't the easiest. As part of my Caller ID issues, I wanted to get a hold of the logs in real time.
To do this, I used Wireshark. I set the syslog server to the IP address of my laptop, the syslog level to DEBUG & send SIP Log to 'Yes'.

Start up Wireshark & use your local interface. In the filter, set the like below;
ip.addr == 192.168.1.201 and syslog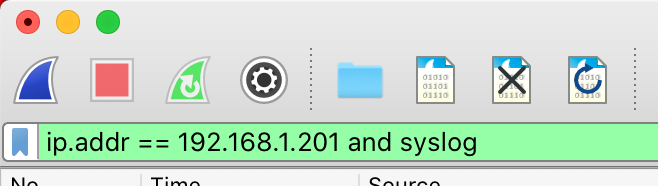
This will display all of the output from the HT503 syslog. It certainly isn't the easiest troubleshooting method, but it might point you in the right direction.
Remember to disable the syslog output by deleting the IP and setting level to 'NONE' when you're done.
FreePBX Logs
It's possible to check if the HT503 has registered with Asterisk. Visit Reports > Asterisk Info.
Under Channels, you should see the extension as 'ONLINE' or 'OFFLINE'.
Scrolling down, you should get more Peer information for the extension.


Very detailed logs can also be found under Reports > Asterisk Log Files. These take a bit of getting used to as well, but do help with troubleshooting.
Inbound Ring Groups
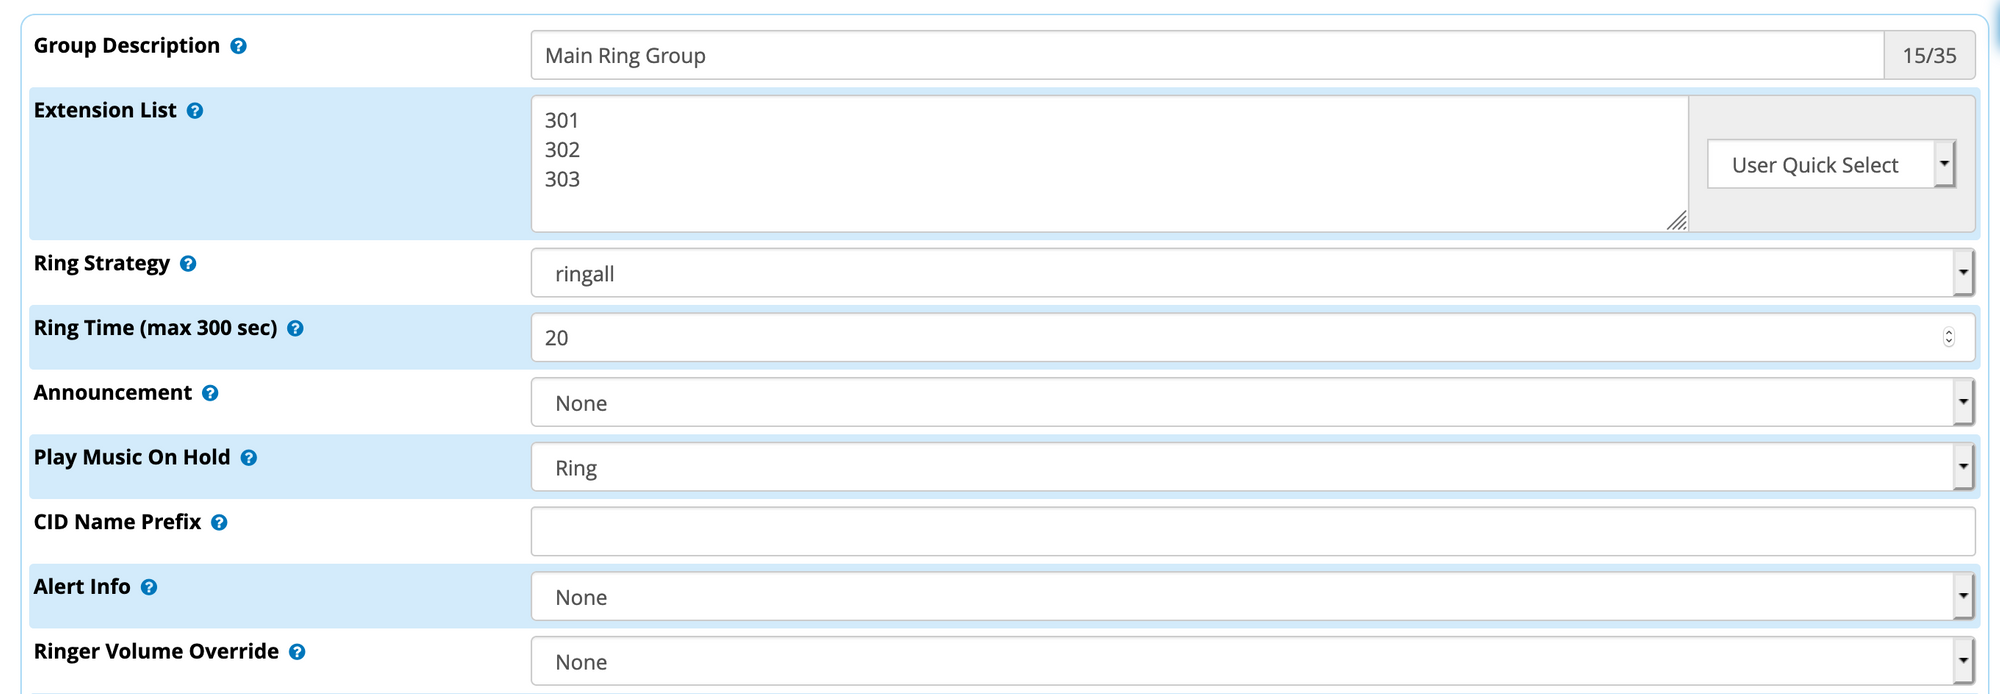
As mentioned above, ring groups allow calling of multiple extensions at once. In my installation, I use group '401' to call extensions '301', '302' and '303'.
301 is a desk phone, 302 is a Zulu softphone and 303 is the FXS Handheld.
If I pick up any phone and call '401', it rings all the other phones in the group. My main Inbound Route destination is Ring Group 401 so all extensions ring.
Adding a ring group is simple. Using Applications > Ring Group, add a group and give it a description. Add the list of extensions you wish to ring (one per line), and choose a ring strategy.
Hovering over the question mark icon will give you details on the available strategies - 'ringall' is probably what you want!
Emergency calls - 999 / 112 / 911
Finally, we are going to look at Emergency Calls.
Note that for my application, there's only one way to route emergency calls, and that is through the HT503. If that line is in use, there is no backup line and the call cannot be routed via my SIP trunks. This means if someone is using the line, we can not call emergency services - which is no different to as normal phone system. Consider this point carefully when designing a PBX system and always have a backup plan.
If you are in the USA, you'll want to research Kari's Law and Ray Baum's Act. If you aren't in the USA, you're still going to want to follow their lead with these Laws & Acts.
Kari's Law (in a nutshell) requires users to be able to dial 911 without having to add a prefix (like 9). It also requires a multi-line system to provide notification to a front desk or security office in the event of an outgoing 911 call.
Ray Baum's Act (again, simplified), requires a 'dispatchable location' to be available to a 911 operator, so basically requires a caller ID.
Please visit the FreePBX Wiki for E911 before continuing.
The following information is based on my set up - don't use it as a guide.
I have added a separate outbound route for emergency calls. This places all emergency calls out using the HT503. Because it uses the landline, the emergency services will receive caller ID with location.
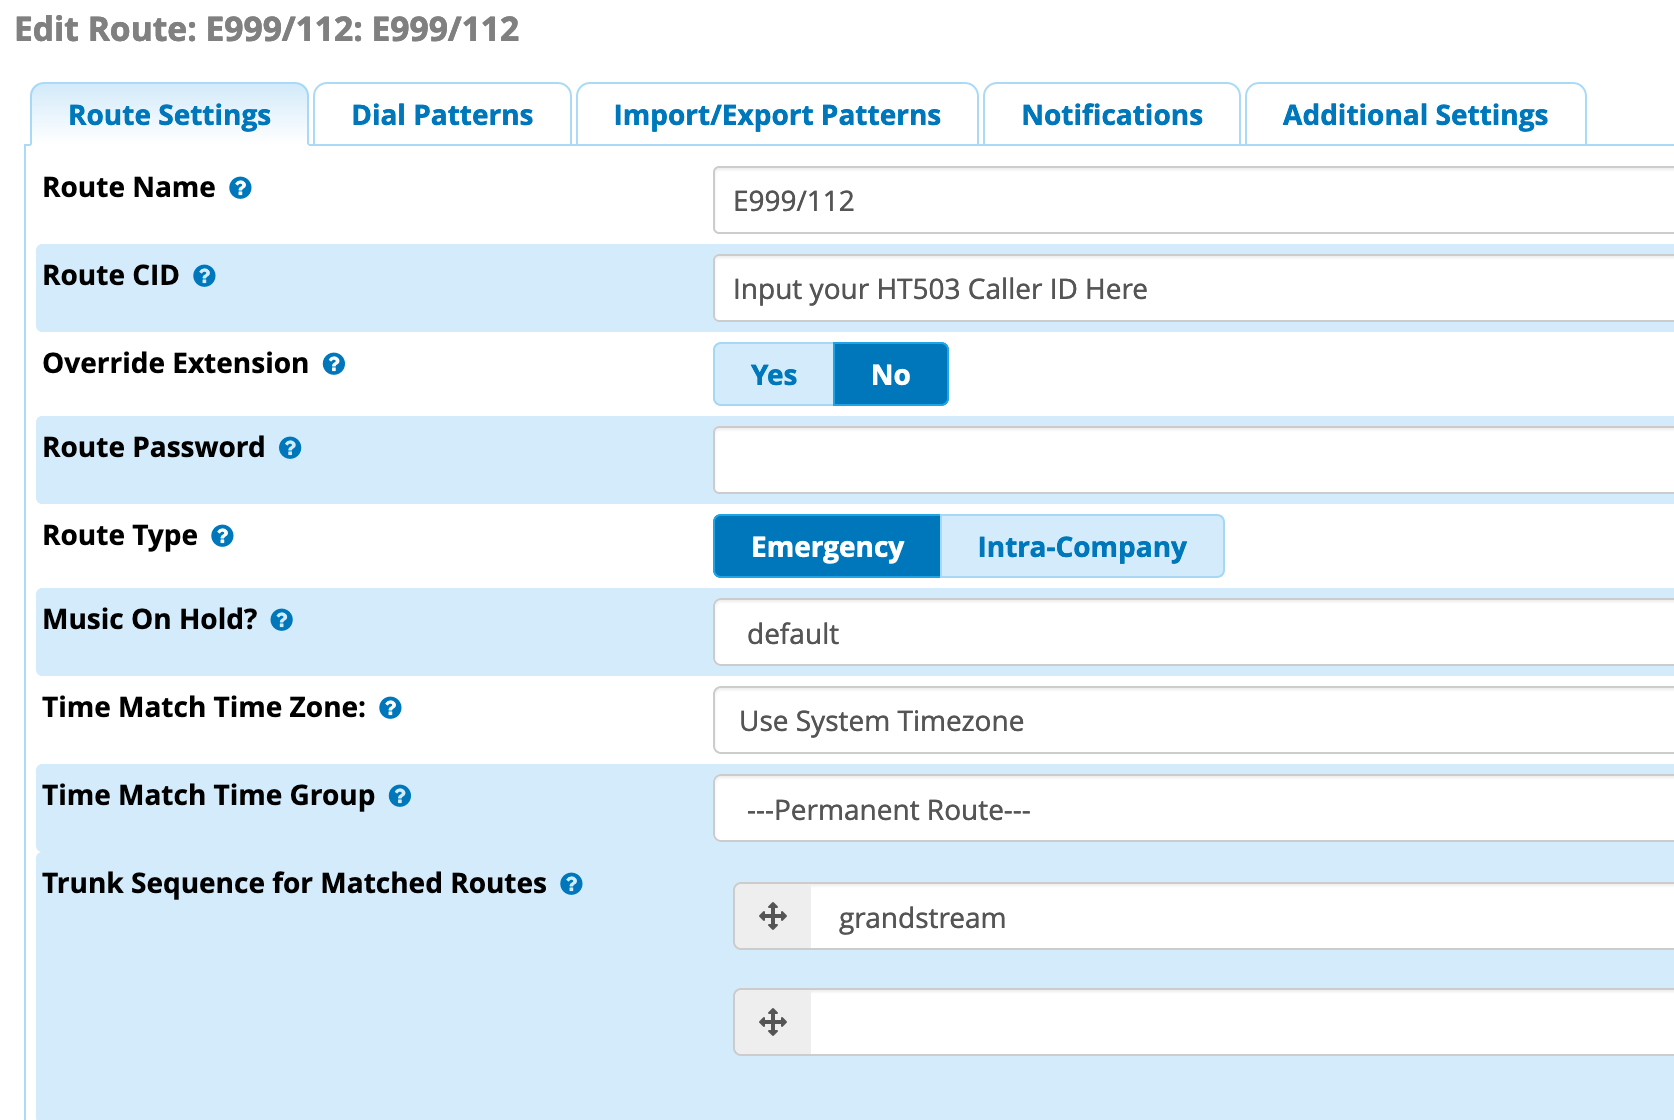
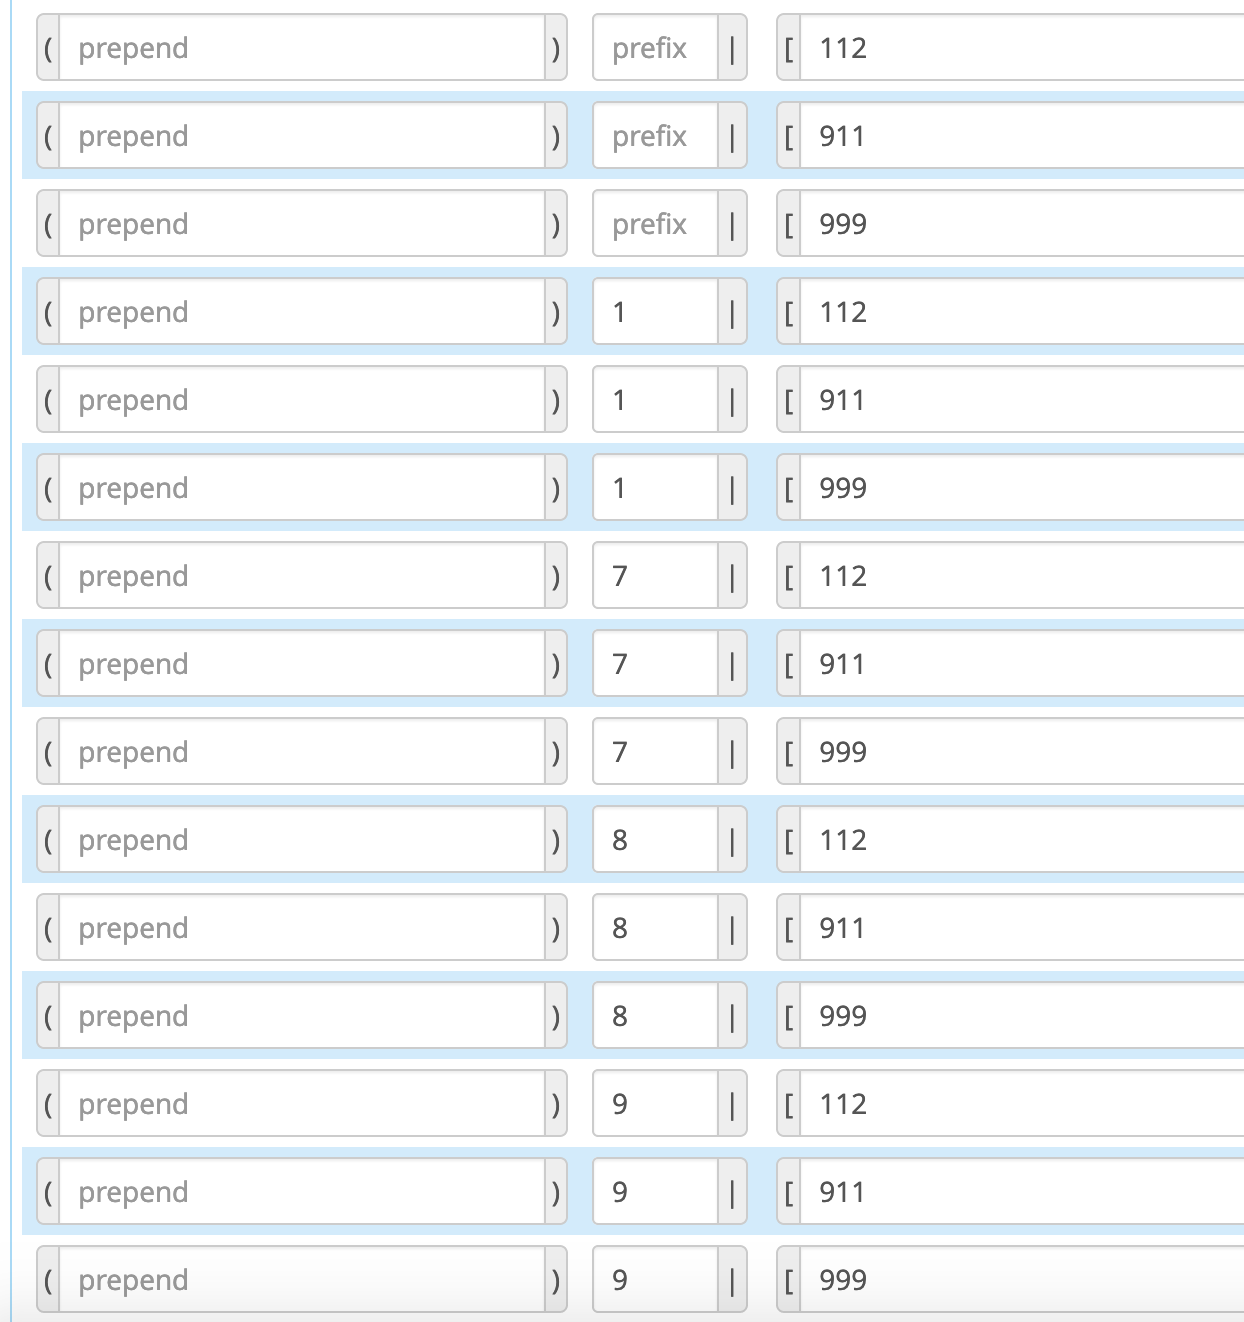
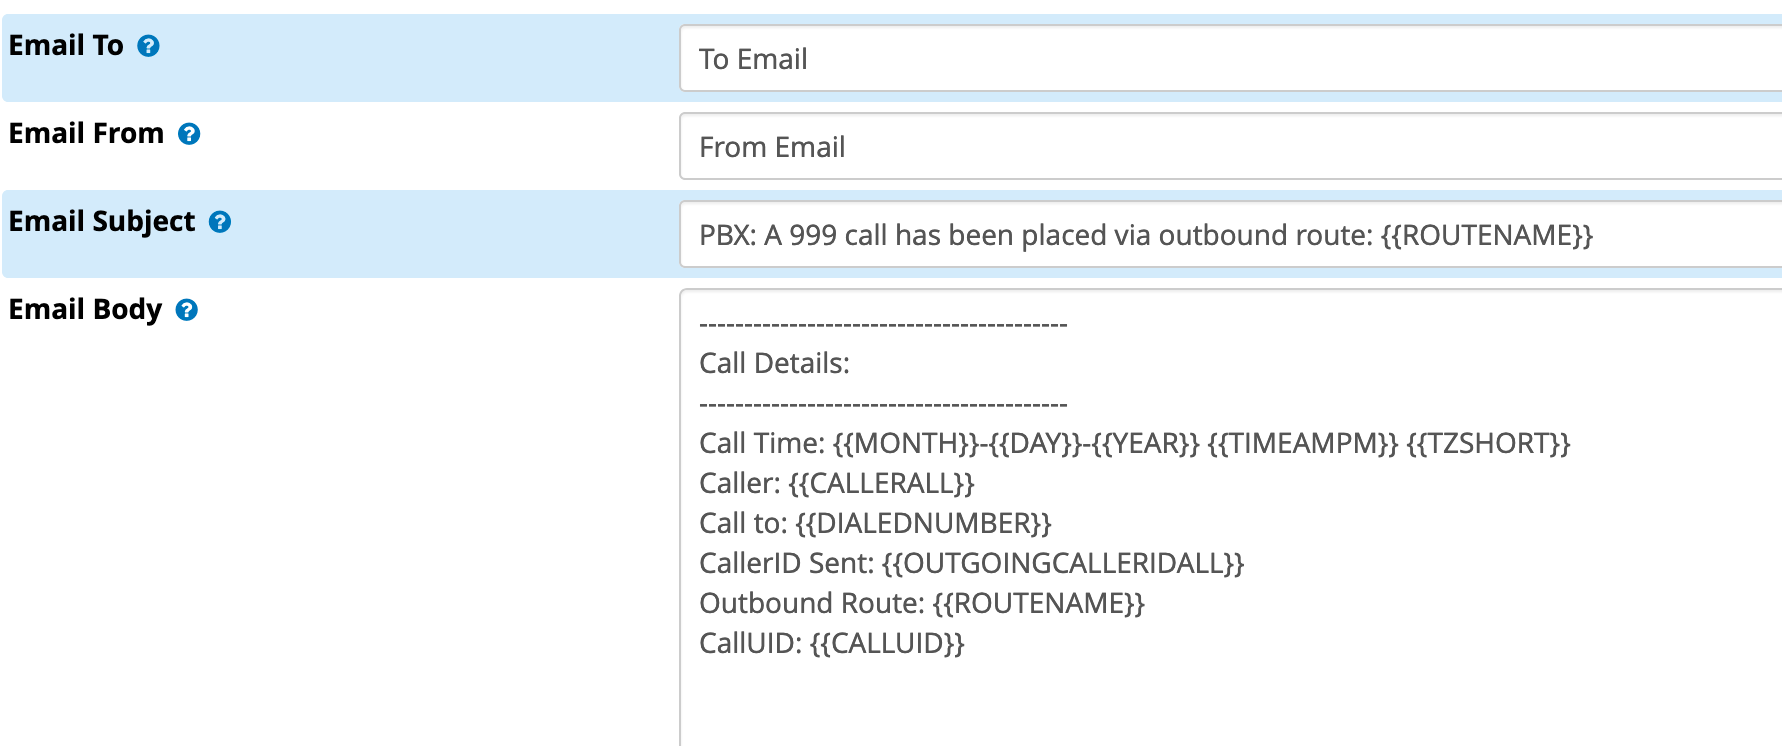
Secondly, I have added dial patterns that allow no prefix, or a prefix of 1, 7, 8 or 9 before the numbers 911, 112 & 999, and finally, because we have no front desk or security office at home, it will email a notification that a 999 call was made. If you are in the USA, the FreePBX Wiki explains how to set up a paging call to notify certain extensions of an outgoing 911 call.
Finally, this outbound route should be at the top of the route list - so it will be dialled first.

This is the end of our second post on FreePBX, hopefully you found the setup of the HT503 slightly easier than I did. There are a lot of settings, and the important ones tend to be hidden in the middle of advanced settings that very few are likely to touch!
Check back soon for Part 3 in the series, which covers provisoning of the Polycom VVX Series phones!
Resources
HT503 user manual:
http://www.grandstream.com/sites/default/files/Resources/ht503_user_manual.pdf
Wireshark:
https://www.wireshark.org/
FreePBX E911 Setup:
https://wiki.freepbx.org/display/FOP/Set+up+Emergency+Service(E911)+calling+requirements
Graham Miln HT503 Blog:
https://stories.miln.eu/graham/2017-09-24-telephone-calls-via-ht-503-raspberry-pi/