BGP: Route48 Tunnelbroker


Part two of BGP series… check out Part 3: Route48 over BGP
Update 16-JUN-22:
- Added MTU for IPv6 Neighbour Discovery / Router Advertisements and associated notes.
In this post I will introduce Route48, specifically the basic Tunnelbroker service, utilising a Mikrotik Cloud Hosted Router.
Configuration should be similar for any Mikrotik device, however to use WireGuard you will need to update to RouterOS version 7.
If you haven't previously updated to ROS7, be sure to read the documentation & forums before you do so as your configuration may break in the upgrade process.
This configuration will consist of command line configurations, however you can use the WebFig or WinBox to configure the system - just fill the relevant boxes using the code below.
What is Route48?
The idea behind this project is to enable a regular user to learn, use and play with IPv6, BGP, and networking in a safe, free and automated manner. As an LIR it is our responsibility to promote and endorse the use of IPv6 to our end clients and serve them with the opportunity to learn and use IP resources (in this case IPv6 resources)
We take pride in knowing that we are actively supporting the adoption of IPv6 for users that would otherwise find it too difficult.
Route48 is heavily dependent on sponsors, so be sure to visit their sponsors list or consider contacting them with sponsorship offers!
Before we begin... Security!
Mikrotik has no default allow rule in the firewall, plus you don't receive any "protection" from NAT when using IPv6. All end devices will have a globally route-able address, so any security vulnerabilities can be exploited by anyone else on the IPv6 internet.
Refer to the Mikrotik documentation for more information on securing your router.
Let's get started!
There are two main parts to this tutorial:
- Creating the IPv6 tunnel & configuring it on the Mikrotik device,
- Configuring the Mikrotik router to advertise an IPv6 subnet you can use for other devices connected to the router.
Creating the IPv6 tunnel
Start by logging into the Route48 Portal.
On the left bar, click "IPv6 Tunnels", then click "New Tunnel".
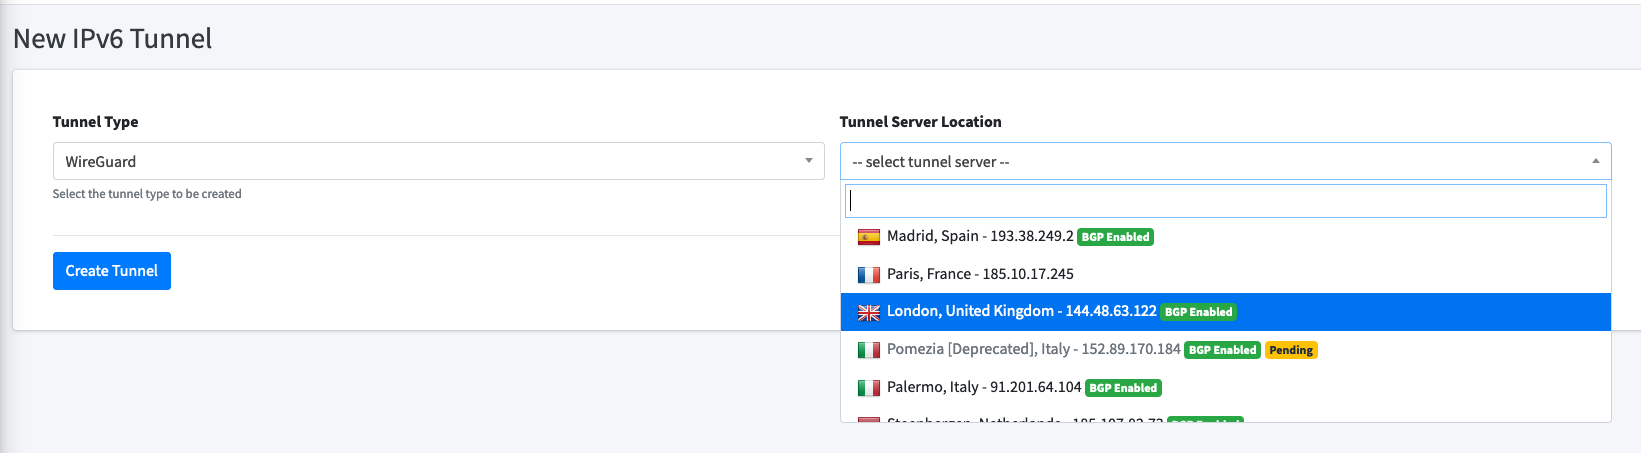
This post will focus on WireGuard, so select that as the tunnel type (the Route48 team recently also added ZeroTier!)
Select a tunnel server location near to you.
If you plan to use BGP in future, it'd be wise to also select a BGP Enabled server. This will save you having to reconfigure the tunnel to use BGP.
Once this is running, you'll see a tunnel has been created. Click the "Config" button:

You'll now be shown a configuration for the WireGuard tunnel, consisting of:
- Interface Private Key
- Interface Address
- Peer Public Key
- Peer AllowedIPs
- Peer Endpoint
We will use each of these configuration lines for our Mikrotik configuration.
Tunnel Setup on Mikrotik device
Let's get the tunnel running on the router - first step, log in to your router.
Add the WireGuard interface within /interface/wireguard:
[admin@MikroTik] /interface/wireguard> add name=Route48-LON private-key="PrivateKeyFrom#1GoesHere="This will create a WireGuard interface on the router, to which we can assign an IP address.
Note that the private key is surrounded by quotation marks and ends with an equals sign.
Next up we add the address of our side within the WireGuard tunnel in /ipv6/address:
[admin@MikroTik] /ipv6/address> add interface=Route48-LON address=2a06:a004:2003::2/48We use the tunnel address from step 2 above. In this case I was assigned 2a06:a004:2003::2/48.
Our side of the tunnel ends with ::2, the Route48 server has ::1
We can connect our WireGuard interface to the Route48 server in /interface/wireguard/peers:
[admin@MikroTik] /interface/wireguard/peers> add interface=Route48-LON public-key="PublicKeyFrom#3GoesHere=" allowed-address=::/1,8000::/1 endpoint-address=144.48.63.122 endpoint-port=51822You'll need to name the interface per the step above, the public-key, endpoint-address and endpoint-port from the Route48 site.
Let's add the /ipv6/route next. This tells the router to send all IPv6 traffic to the Route48 server (if it doesn't have a better route) :
[admin@MikroTik] /ipv6/route> add dst-address=::/0 gateway=2a06:a004:2003::1Your tunnel should now be up and running! You can confirm this by typing /interface/wireguard/print - you should see the letter 'R' in bold beside the interface!
Troubleshooting
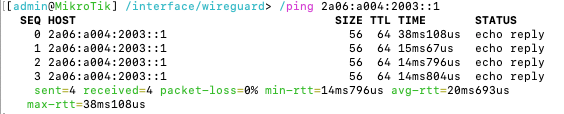
Now is a good time to check connectivity before we move forward to end-device configuration. A simple ping command should tell us how far we can reach.
Change the commands in 1 & 2 with your subnet from Route48, but keep the end hextet ::1 and ::2.
- Check we can reach the local router:
/ping 2a06:a004:2003::2. If this fails, check the/ipv6/addresssection. - Check we can reach the Route48 router:
/ping 2a06:a004:2003::1. If this fails, check the/interface/wireguard/and/interface/wireguard/peerssection. - Check we can reach beyond the Route48 router, e.g. Google:
/ping 2001:4860:4860::8888. If this fails, check/ipv6/routes. - If ping works but websites do not, see the note below on MTU.
Adding IPv6 to other devices on the network
IPv6 doesn't typically use DHCP like IPv4 - it can do it, but it's not normally necessary unless you need to designate DNS servers, etc.
IPv6 instead uses Neighbour Discovery and Router Advertisements.
If you don't know what this means, I really recommend checking out the Hurricane Electric (free) IPv6 Certification program - reach the Sage level and get a free t-shirt!
When we configured the tunnel above we used the Route48 /48 subnet, however advertisements from the Mikrotik router to our local network require a /64 subnet.
We can use 64 thousand /64 subnets from the assigned /48, so not much fear of running out of addresses!
In my case, I added b00 to the end of my /48 subnet to create the network 2a06:a004:2003:b00:0000:0000:0000:0000 - 2a06:a004:2003:b00:ffff:ffff:ffff:ffff.
Notice also that the address of the router is 2a06:a004:2003:b00::, which doesn't end with ::1- with IPv6 there's no need for the number at the end of the address. If I wanted to ping my router from within the network, I can simply use ping6 2a06:a004:2003:b00::.
Getting IPv6 to your end devices is simple... just two steps!
Adding the advertised address to ether2 (my LAN interface - this could also be a VLAN):
[admin@MikroTik] /ipv6/address> add address=2a06:a004:2003:b00::/64 advertise=yes interface=ether2Side note, if using different VLANs, add an IPv6 address per VLAN.
Next, we set /ipv6/nd (Neighbour Discovery) to the correct interface.
By default the ND is enabled for all interfaces, but we just want it to run for our (V)LAN:
[admin@MikroTik] /ipv6/nd> set [ find default=yes ] interface=ether2 mtu=1410
At this point you should now re-run the troubleshooting section above, then check if you have IPv6 connectivity on your end devices!
A word on MTU
This post was edited to include MTU for the Router Advertisement. The MTU (Maximum Transmission Unit) defaults to "unspecified" (so probably 1500) but our WireGuard tunnel is 1420. This means the traffic being sent via the tunnel may be fragmented.
This may give inconsistent behaviour on your end devices - in my case I could ping most places in the IPv6 world and most IPv6 sites would load, but some sites (random ones) like blitzortung.org and route64.org would fail to load.
So, if you can ping but can't browse, check the MTU.
What's next?
The next post has us setting up BGP sessions with Route48, advertising our very own IPv6 addresses!
