Tower Status Light (On Air light) 🚦
'Working from home' during the COVID pandemic has created new challenges for many of us. I thought it would be a good idea to have a status light to indicate when I am on a call to reduce the chances of being interrupted.


I worked as an Engineer in my previous life, and I frequently saw 'tower status lights' on industrial equipment to indicate if they were working or had thrown faults. It's an easy way to spot from across a factory floor if something needs attention. You might have even see one on a self checkout in your local store.

'Working from home' during the COVID pandemic has created new challenges for many of us. I thought it would be a good idea to have a status light to indicate when I am on a call to reduce the chances of being interrupted... Do you remember this hilarious interview?


There have been a few iterations of similar 'On Air' lights popping up recently as well, such as this one (there are loads of examples on Thingiverse - the theory is the same, just a different 3D printed device!);
 Thingiverse.com
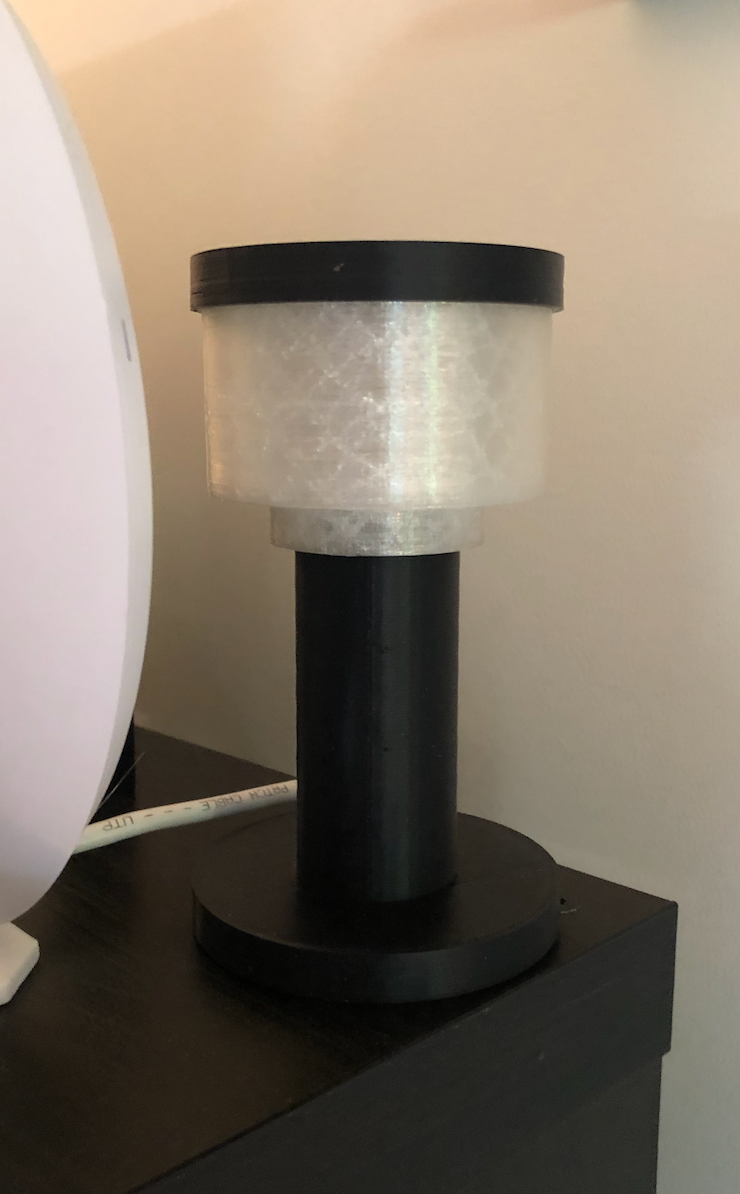
The Tower
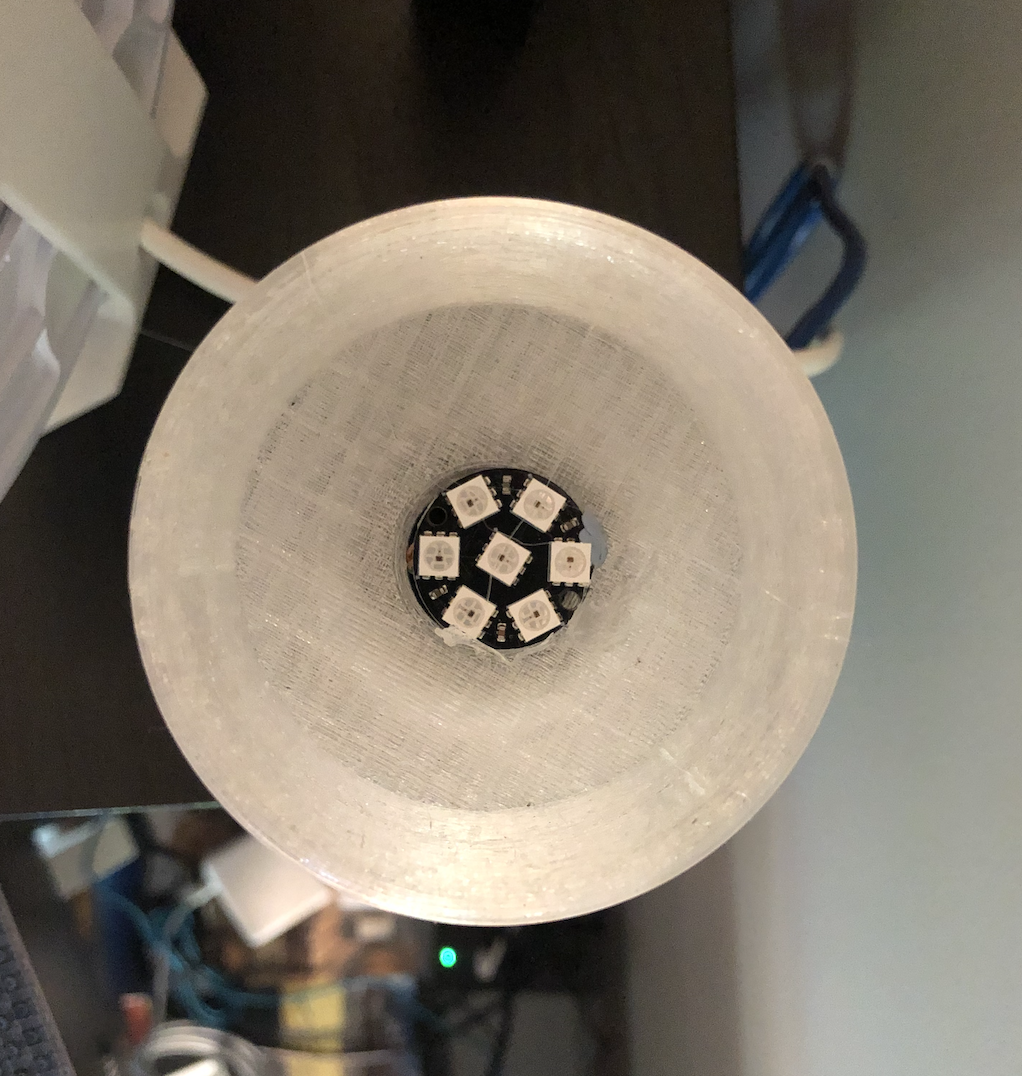
I decided to go for a tower style design. I started off by creating a design in Fusion 360 that would be smaller than a typical status light, but wide enough to fit a WS2812 circular LED matrix. You will see later that I might have over-done it a bit for the LED matrix...
The design I settled on is below, all 3D printed with PLA (with 'transparent' PLA in for the lens section). The parts all snap together.
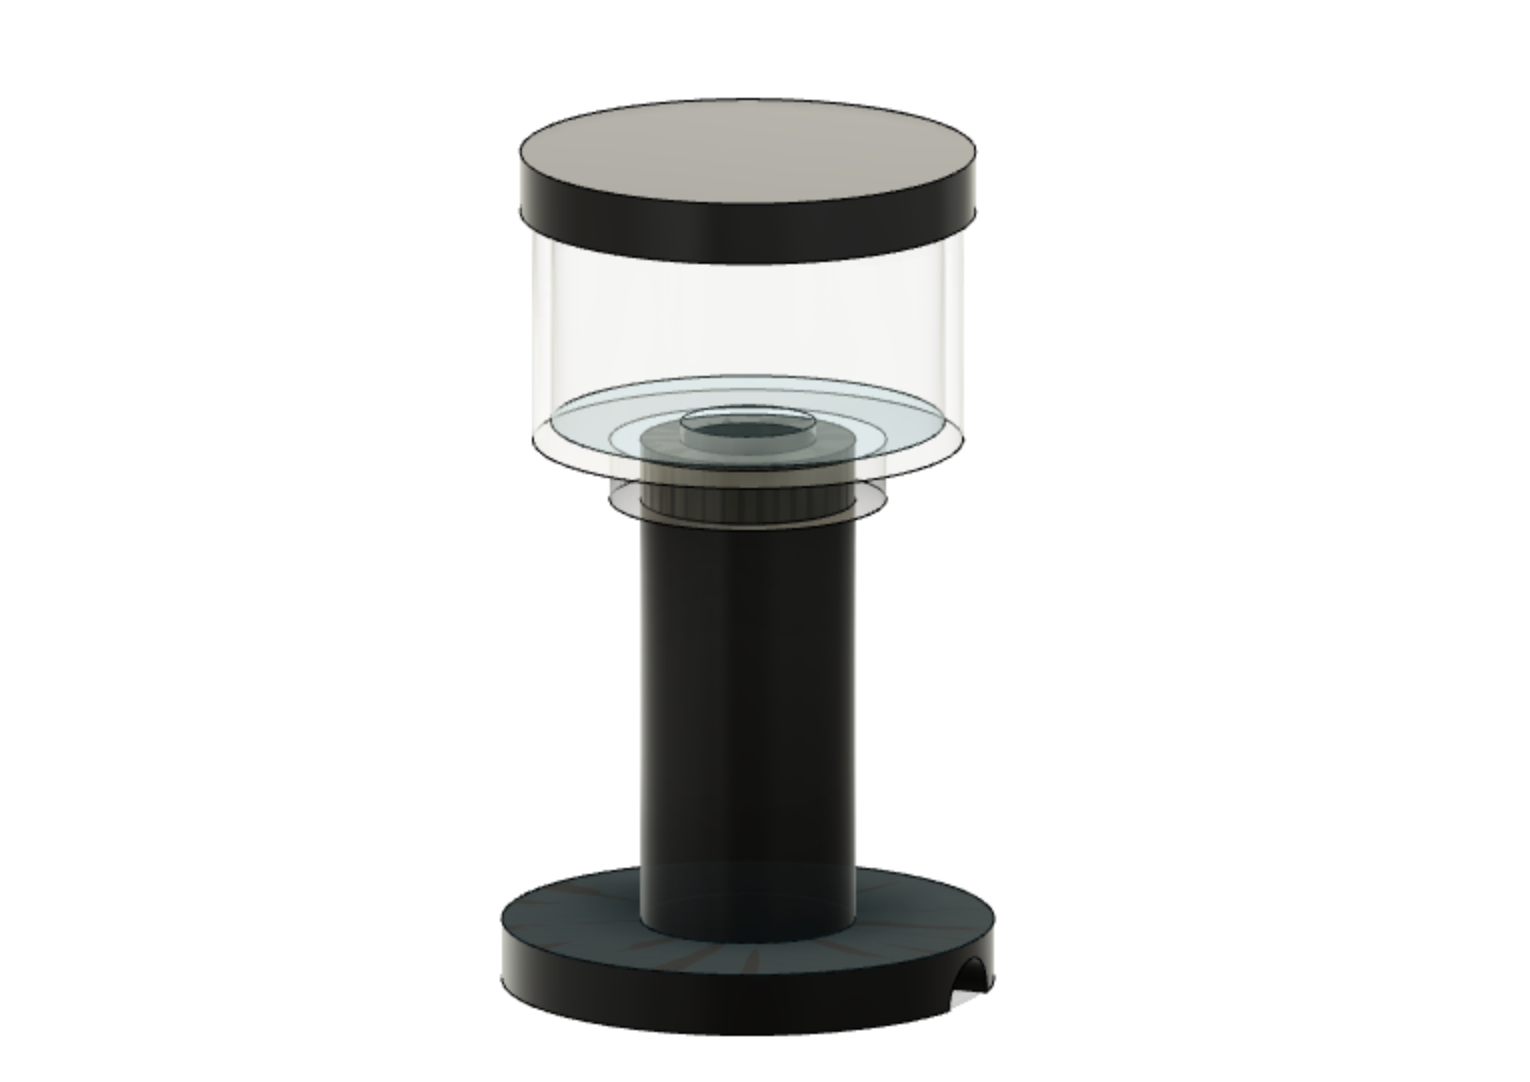
The WS2812 (aka 'neopixel') is connected directly to an ESP8266. I chose a 7-bit module for the tower. This gives full RGB, and as I'm sure you can guess if you have read my other posts, it can be controlled using MQTT via Home Assistant!
ESP8266 Code
The following code can be used with the Arduino IDE and uploaded to the ESP8266. You can add other code in here too, so the ESP does more than one job. The node I have connected also has a DHT22 to monitor temperature and humidity in the lab.
//
//  NODETWR - Lab Tower Light
//
//

#include <ESP8266WiFi.h>
#include <PubSubClient.h>
#include <ArduinoJson.h>
#include <Adafruit_NeoPixel.h>
#ifdef __AVR__
#include <avr/power.h> // Required for 16 MHz Adafruit Trinket
#endif

const int BUFFER_SIZE = 300;

// RGB LED
#define LEDs D2 // LED Module connected to D2
#define NUMPIXELS 7 // Number of BITs on the NeoPixel

Adafruit_NeoPixel pixels(NUMPIXELS, LEDs, NEO_GRB + NEO_KHZ800);

byte red = 255;
byte green = 255;
byte blue = 255;
byte brightness = 255;

byte realRed = 0;
byte realGreen = 0;
byte realBlue = 0;

bool stateOn = false;

const char* on_cmd = "ON";
const char* off_cmd = "OFF";

//Constants for WiFi and MQTT
const char* ssid = "CHANGE_ME";
const char* password = "CHANGE_ME";
const char* mqtt_server = "CHANGE_ME";
const char* mqttUser = "CHANGE_ME";
const char* mqttPassword = "CHANGE_ME";

WiFiClient espClient;
PubSubClient client(espClient);

//Vars for timing loop
unsigned long interval = 500; // the time we need to wait
unsigned long intervalLong = 60000; // update mqtt topics every minute
unsigned long now = 0; // init time
unsigned long timeOld = 0;
unsigned long timeVeryOld = 0;


//Requirements for WiFi and MQTT
void setup_wifi() {

  delay(10);
  Serial.println();
  Serial.print("Connecting to ");
  Serial.println(ssid);

  WiFi.enableAP(0);
  WiFi.begin(ssid, password);

  while (WiFi.status() != WL_CONNECTED) {
    delay(500);
    Serial.print(".");
  }

  randomSeed(micros());

  Serial.println("");
  Serial.println("WiFi connected");
  Serial.println("IP address: ");
  Serial.println(WiFi.localIP());
}

void reconnect() {
  // Loop until we're reconnected
  while (!client.connected()) {
    Serial.print("Attempting MQTT connection...");
    // Create a random client ID
    String clientId = "TowerNode-";
    clientId += String(random(0xffff), HEX);
    // Attempt to connect
    if (client.connect(clientId.c_str(), mqttUser, mqttPassword)) {
      Serial.println("connected");
      // Once connected, publish an announcement...
      digitalWrite(2, LOW);   // Turn the LED on by making the voltage LOW
      delay(1000);            // Wait for a second
      digitalWrite(2, HIGH);   // Turn the LED off by making the voltage HIGH
      delay(1000);
      digitalWrite(2, LOW);   // Turn the LED on by making the voltage LOW
      delay(1000);            // Wait for a second
      digitalWrite(2, HIGH);   // Turn the LED off by making the voltage HIGH
      delay(1000);
      client.publish("nodeTwr/avail", "online");
      client.subscribe("nodeTwr/lightset");

    } else {

      Serial.print("failed, rc=");
      Serial.print(client.state());
      Serial.println(" try again in 5 seconds");
      digitalWrite(2, LOW);   // Turn the LED on by making the voltage LOW
      delay(1000);            // Wait for a second
      digitalWrite(2, HIGH);   // Turn the LED off by making the voltage HIGH
      delay(1000);
      digitalWrite(2, LOW);   // Turn the LED on by making the voltage LOW
      delay(1000);            // Wait for a second
      digitalWrite(2, HIGH);   // Turn the LED off by making the voltage HIGH
      delay(1000);
      digitalWrite(2, LOW);   // Turn the LED on by making the voltage LOW
      delay(1000);            // Wait for a second
      digitalWrite(2, HIGH);   // Turn the LED off by making the voltage HIGH
      delay(1000);
      // Wait 5 seconds before retrying
      delay(5000);
    }
  }
}
// Get MQTT messages in topic 'nodeTwr/lightset'
void callback(char* topic, byte* payload, unsigned int length) {

  String payloadData;             // we start, assuming open
  String topicData;

  Serial.print("Message arrived in topic: ");
  Serial.println(topic);
  topicData = String(topic).c_str();
  Serial.print("Message:");

  char message[length + 1];
  for (int i = 0; i < length; i++) {
    message[i] = (char)payload[i];
  }
  message[length] = '\0';
  Serial.println(message);

  if (topicData == "nodeTwr/lightset") {

    if (!processJson(message)) {
      return;
    }

    if (stateOn) {
      // Update lights
      realRed = map(red, 0, 255, 0, brightness);
      realGreen = map(green, 0, 255, 0, brightness);
      realBlue = map(blue, 0, 255, 0, brightness);
    }
    else {
      realRed = 0;
      realGreen = 0;
      realBlue = 0;
    }

    pixels.clear(); // clear the pixel buffer
    setColor(realRed, realGreen, realBlue); // set the pixel buffer
    pixels.setBrightness(brightness); // set the pixel brightness
    pixels.show(); // send to the pixels
    sendState(); // send feedback to HA about new state

  }

  Serial.println();
  Serial.println("-----------------------");
}

bool processJson(char* message) {
  StaticJsonBuffer<BUFFER_SIZE> jsonBuffer;

  JsonObject& root = jsonBuffer.parseObject(message);

  if (!root.success()) {
    Serial.println("parseObject() failed");
    return false;
  }

  if (root.containsKey("state")) {
    if (strcmp(root["state"], on_cmd) == 0) {
      stateOn = true;
    }
    else if (strcmp(root["state"], off_cmd) == 0) {
      stateOn = false;
    }
  }

  if (root.containsKey("color")) {
    red = root["color"]["r"];
    green = root["color"]["g"];
    blue = root["color"]["b"];
  }

  if (root.containsKey("brightness")) {
    brightness = root["brightness"];
  }

  return true;
}

void setColor(int inR, int inG, int inB) {

  for (int i = 0; i < NUMPIXELS; i++)
  {
    pixels.setPixelColor(i, inR, inG, inB);
  }

  Serial.println("Setting LEDs:");
  Serial.print("r: ");
  Serial.print(inR);
  Serial.print(", g: ");
  Serial.print(inG);
  Serial.print(", b: ");
  Serial.println(inB);
}

// This sends feedback to Home Assistant to inform it of the new light state, brightness and RGB colour
void sendState() {
  StaticJsonBuffer<BUFFER_SIZE> jsonBuffer;

  JsonObject& root = jsonBuffer.createObject();

  root["state"] = (stateOn) ? on_cmd : off_cmd;
  JsonObject& color = root.createNestedObject("color");
  color["r"] = red;
  color["g"] = green;
  color["b"] = blue;

  root["brightness"] = brightness;

  char buffer[root.measureLength() + 1];
  root.printTo(buffer, sizeof(buffer));

  Serial.println(buffer);
  client.publish("nodeTwr/sendstate", buffer);

}

void setup() {
  pixels.begin();

  timeOld = millis();
  Serial.begin(115200);
  delay(1000);
  Serial.print("Start time: ");
  Serial.println(timeOld);
  setup_wifi();
  client.setServer(mqtt_server, 1883);
  client.setCallback(callback);

  pinMode(2, OUTPUT);     // Initialize GPIO2 pin as an output (for the integrated LED flash during setup)
  pinMode(LEDs, OUTPUT); // set the digital pin as output.

  setColor(0, 0, 0);

}

void loop() {
  unsigned long now = millis(); // grab current time

  //Ensures MQTT client is connected
  {
    if (!client.connected()) {
      reconnect();
    }
    client.loop();

    //Timer
    if ((unsigned long)(now - timeOld) >= interval) {
      Serial.print("time is now: ");
      Serial.println(now);
      timeOld = millis();

    //this routine runs every minute to let home assistant know the node is still alive
      if ((unsigned long)(now - timeVeryOld) >= intervalLong) {
        Serial.println();
        Serial.println("60 Second MQTT Update running");
        client.publish("nodeTwr/avail", "online");
        Serial.println("...complete");
        timeVeryOld = millis();
        sendState();
      }

    }
  }
}To add this to Home Assistant, you will need to add some config code (and a working MQTT broker;
sensor:
  - platform: mqtt
    state_topic: 'nodeTwr/avail'
    name: 'NodeMCU4 Availability'
    expire_after: 150

light:
  - platform: mqtt
    schema: json
    name: "Tower Light"
    state_topic: "nodeTwr/sendstate"
    command_topic: "nodeTwr/lightset"
    brightness: true
    rgb: true
    optimistic: false
qos: 0 Result & upgrades
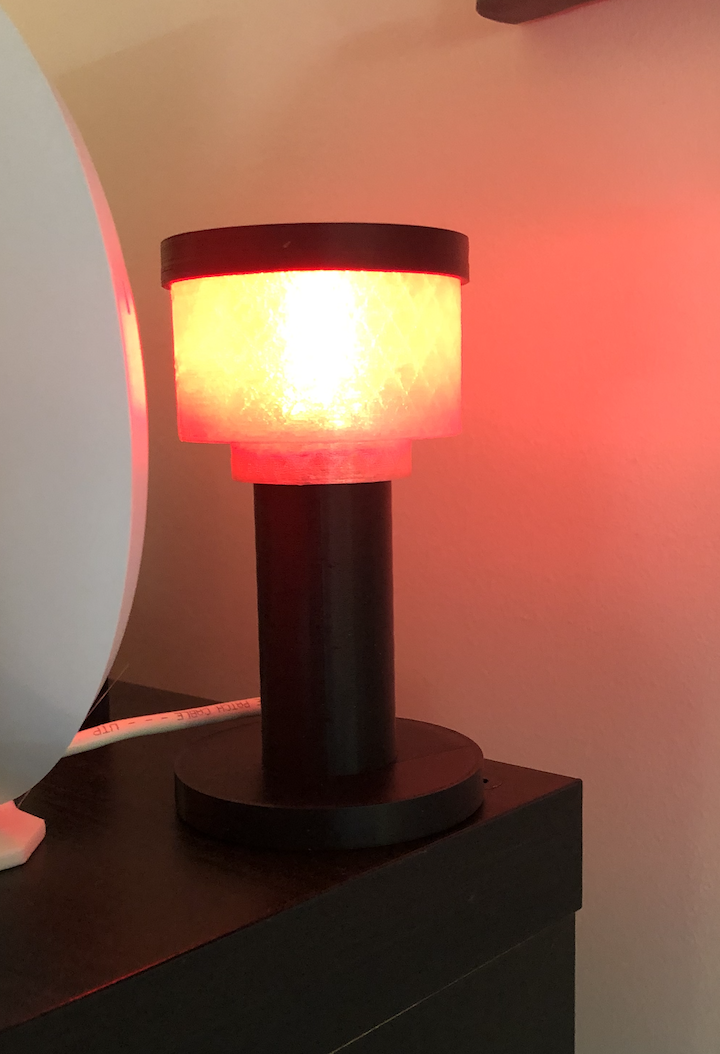
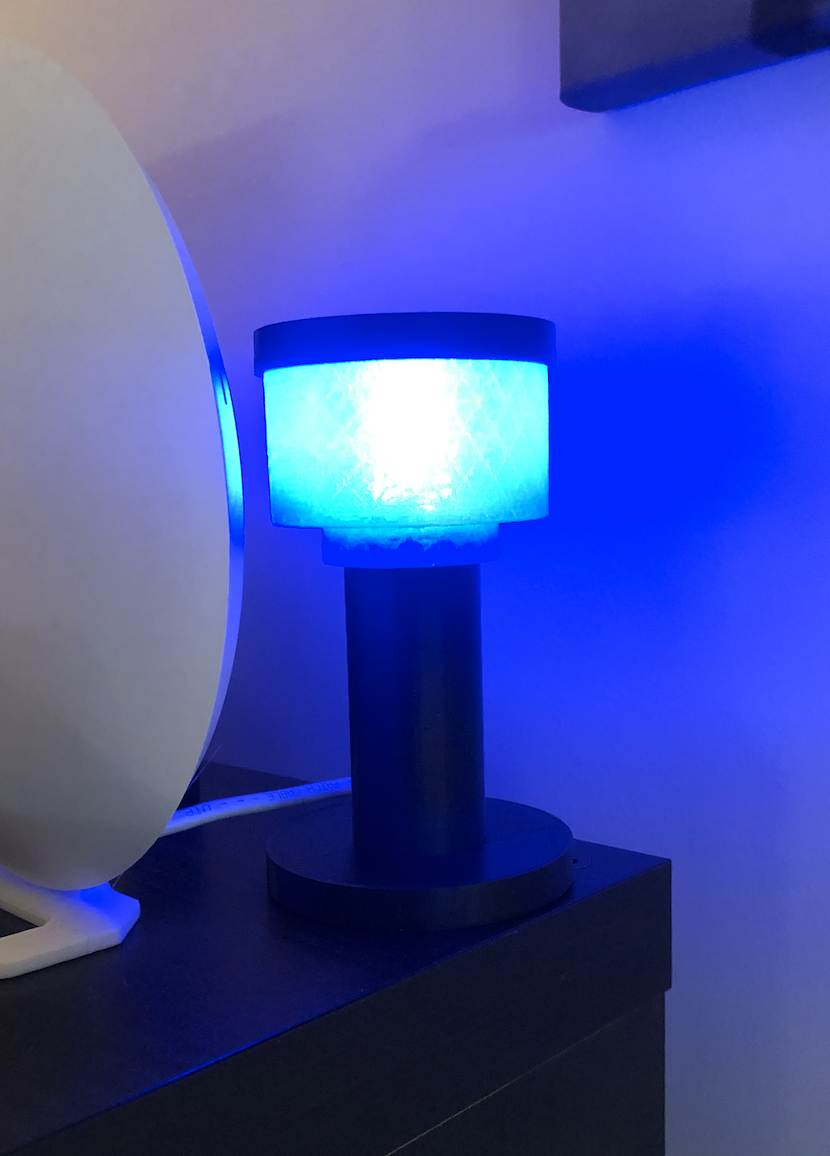
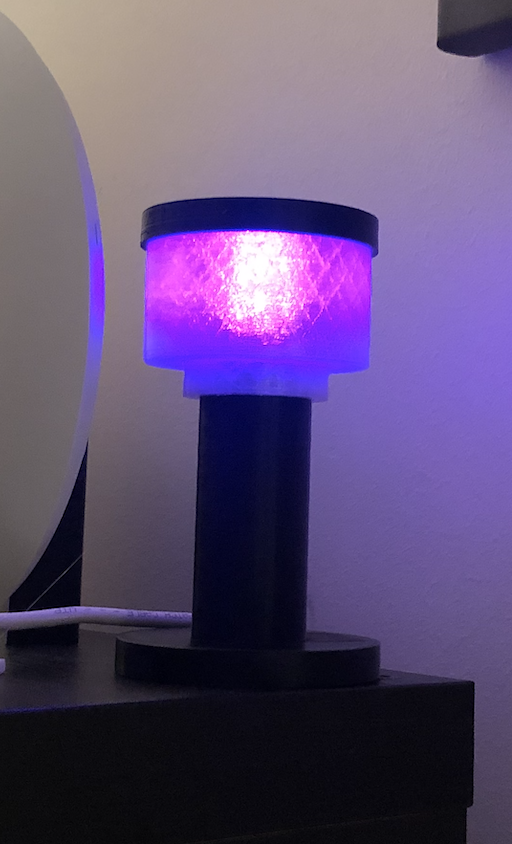
The end product is simple but works very well.
If the light is red, I'm on a call. If it's amber, it's a webinar (and I can probably be interrupted). I set the light manually using my desk macro keyboard - another post to follow for this.

There are a few ways this project could be improved with automation. These could be triggered by Home Assistant, or possibly another node or script.
The light colour could be changed based on different events, for example...
- UV or pollen meter as a reminder for sun-cream or anti-histamines
- Continuous integration build status (see below!)
- Screen time reminder (red = time's up!)
- Automated call status (Teams / Webex integration)
- Email inbox indicator
 Russell Barnes
Did you build this? Or have any comments? Get in touch: hi@xga.ie