GPS Car Tracker 🛰
Inexpensive fleet tracking service guide using Open Source Traccar, a TK103 tracker & Things Mobile SIM Card

A GPS vehicle tracker system can be used to monitor a single car or motorbike, right up to whole fleet management. At its most basic, it allows you to see the location of the vehicle on a map, plus the speed and direction of travel. I previously had a tracker in my Land Rover Defender - which are notoriously easy to steal - giving me a lot of reassurance that I could recover it following a theft, and had the added bonus of recording off-road events!
I decided I would install a tracker in my current car - not for the same reasons, but more a proof of concept for a commercial managed tracking service.
Hardware
I set to and got hold of a TK103 from Amazon. I imagine it is a 'clone', but they do the job just fine. The TK103 has an external GPS and GSM antenna, which means the main box can be hidden somewhere suitable and the antenna placed somewhere it can get a good signal. In my old Landy, I put the antenna in the 'window' area on top of the roof lid, which worked a treat and wasn't visible.
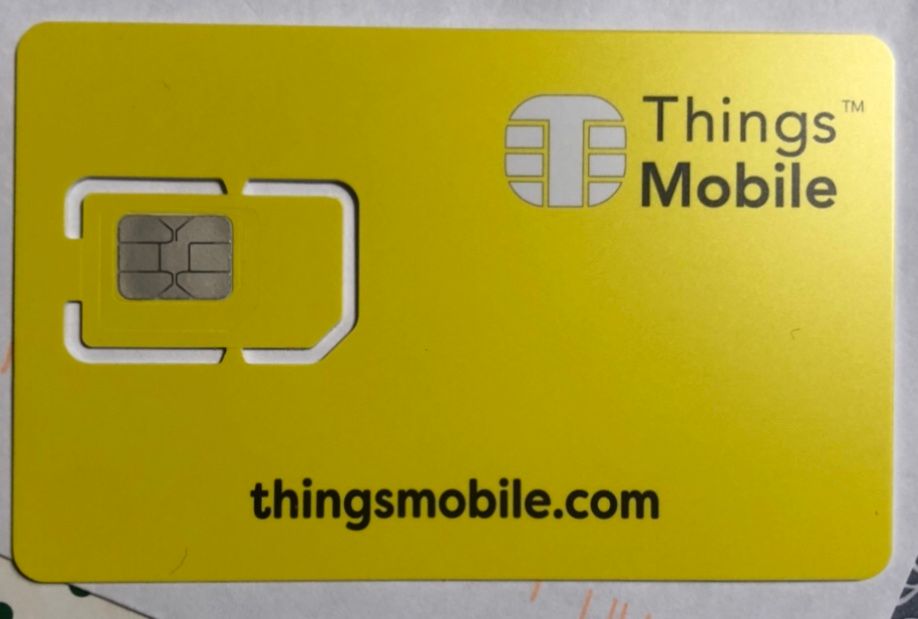
Next up, I needed a SIM card. I previously used a SIM with O2 in the UK - the tracker I ordered doesn't support 3G (only GPRS) - so networks like Three in UK are out of the running. Mix that with outrageous out-of-bundle data rates for local carriers... €1.01/MB for local data, yet only €0.43/MB when EU roaming... doesn't add up, does it?
This time around I found Things Mobile. I ordered a SIM card at the height of the COVID crisis - it was sent on May 4th and arrived June 18th! Things Mobile (TM) is also quite expensive for data at €0.10/MB, however there are some big advantages for our application;
- Data / credit doesn't expire, so no monthly top-up needed.
- Credit can be pooled - top up the account with €30 for example, then have it automatically pull credit to the SIM cards as necessary as the system scales up.
- Roaming is based on zones, for my application, most of Europe is included in Zone 1 (plus the USA) - see the link below.
- The TK103 doesn't actually use that much data when configured correctly, so an expensive data plan is unnecessary!
You will likely need some extra bits, like a couple of in-line fuse holders (if your tracker doesn't come with fuses) and some spade connectors. These can be had for about €20 and will make the install a lot cleaner and safer.
Software
Next up I wanted to make sure I could display the data from the tracker. It's possible to get a simple SMS message with the location, but where's the challenge in that!
Traccar is free & open source program which can be used on a machine on your network, or even better, an always on-VPS. You can set up an Ubuntu VPS for free with Oracle Free Tier. I will be using an Ubuntu VPS for this tutorial, so feel free to set one up if you want to follow along. You'll need to understand SSH & Linux basics, as this article won't cover it.
Traccar also has a 'manager' app for iOS and Andriod, which makes using it on-the-go really easy.
Setup
Steps
These are the steps you'll need to follow to get Traccar up and running:
- Get a SIM Card
- Bench test the tracker
- Set up Traccar
- Set firewall rules
- DNS / Reverse proxy (optional)
- Configure the tracker
- Install the tracker
SIM Card
First off, let's get our SIM ready to go.
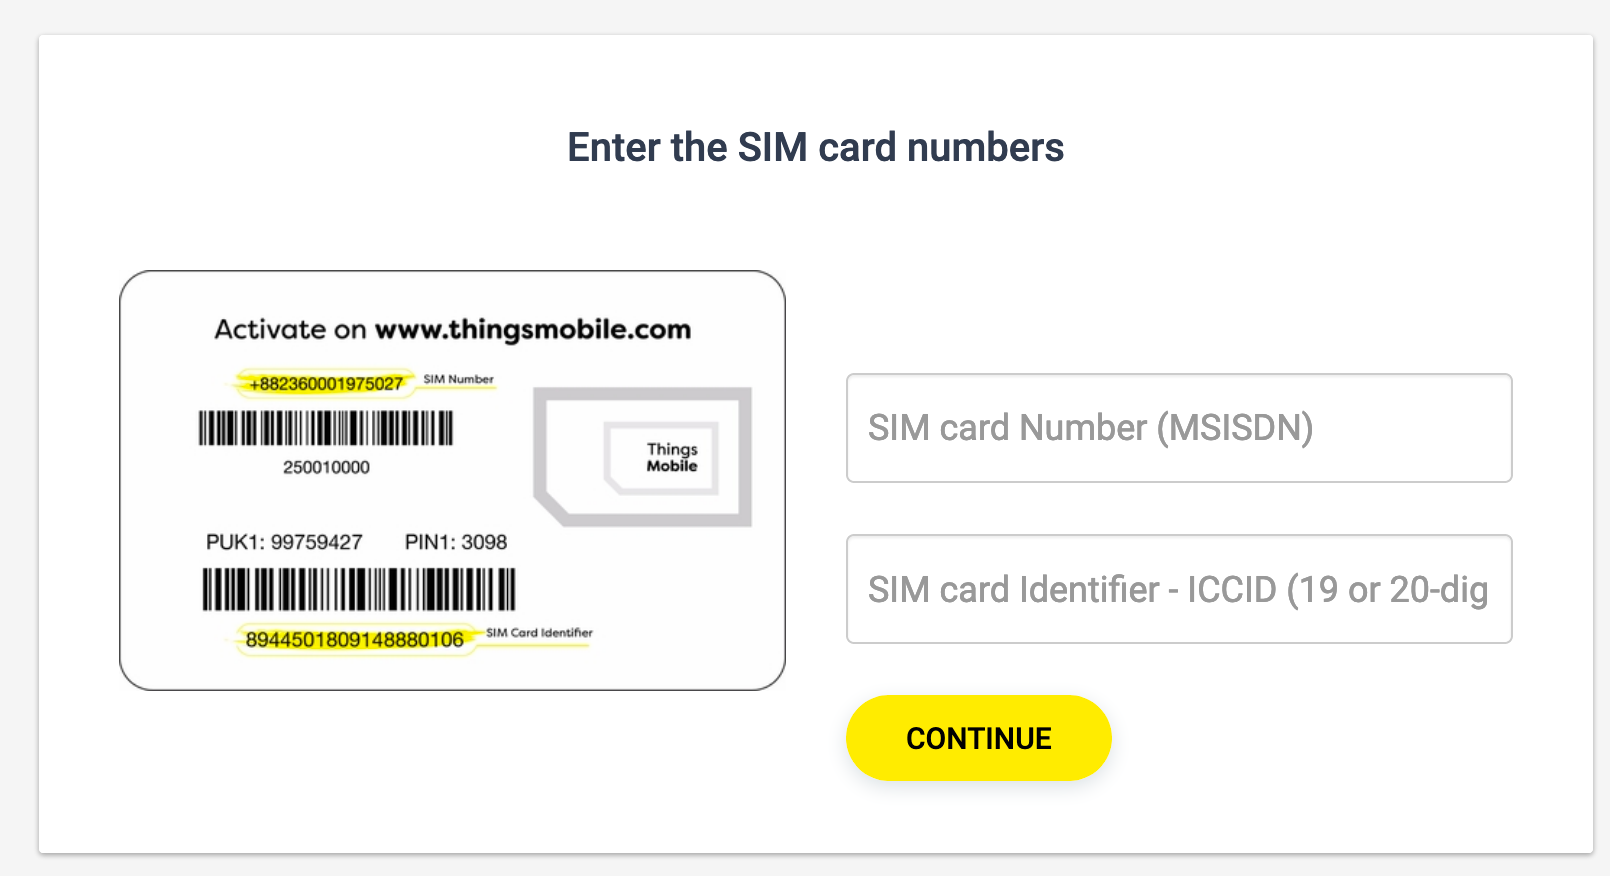
On the back of your SIM, you'll find a number beginning with +88 (MSISDN), and a long number at the bottom of the card (ICCID). You'll need those on the Things Mobile Portal to get the card registered.
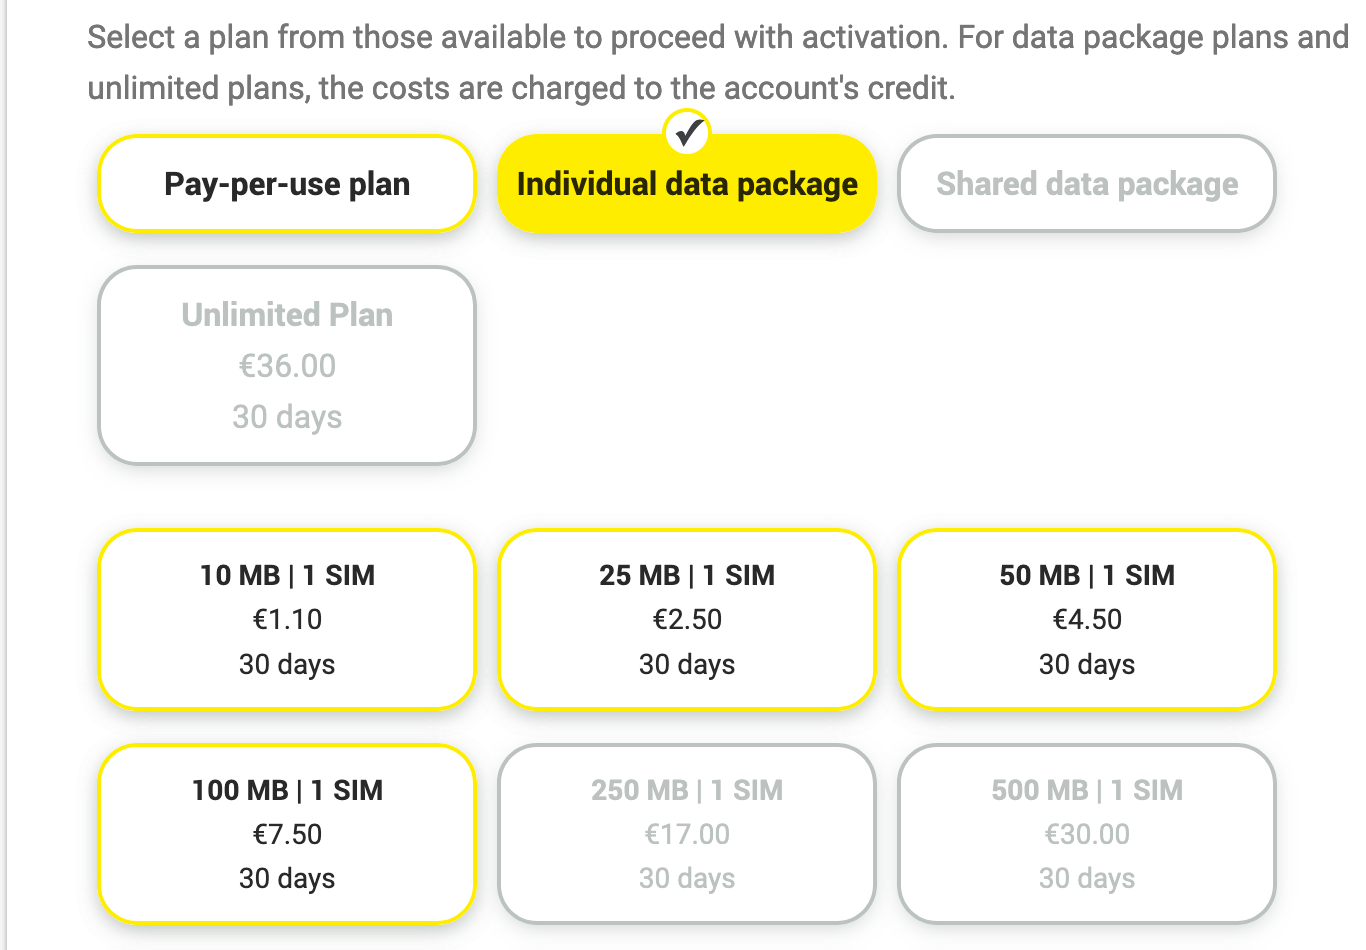
You will get the choice of a pay-per-use or data package - I chose pay-per-use, hopefully my math works out, but I don't think the SIM will use 10MB/month, so I'll save some credit by using the first option. In my first four days of testing, I have used 0.25MB of data - though haven't done any longer drives yet to give proper data estimates - I'll put that at the bottom of the post in an update!
Edit: Following 18 days of the tracker being installed, my device has used 1.25MB, so well below my 10MB/month estimate. A day with just shy of 5 hours of driving used 0.24MB. To get low GPRS data usage, my tracker needed commanded to do so: read on for more.
These are the options for Data Packages (not recommended!)
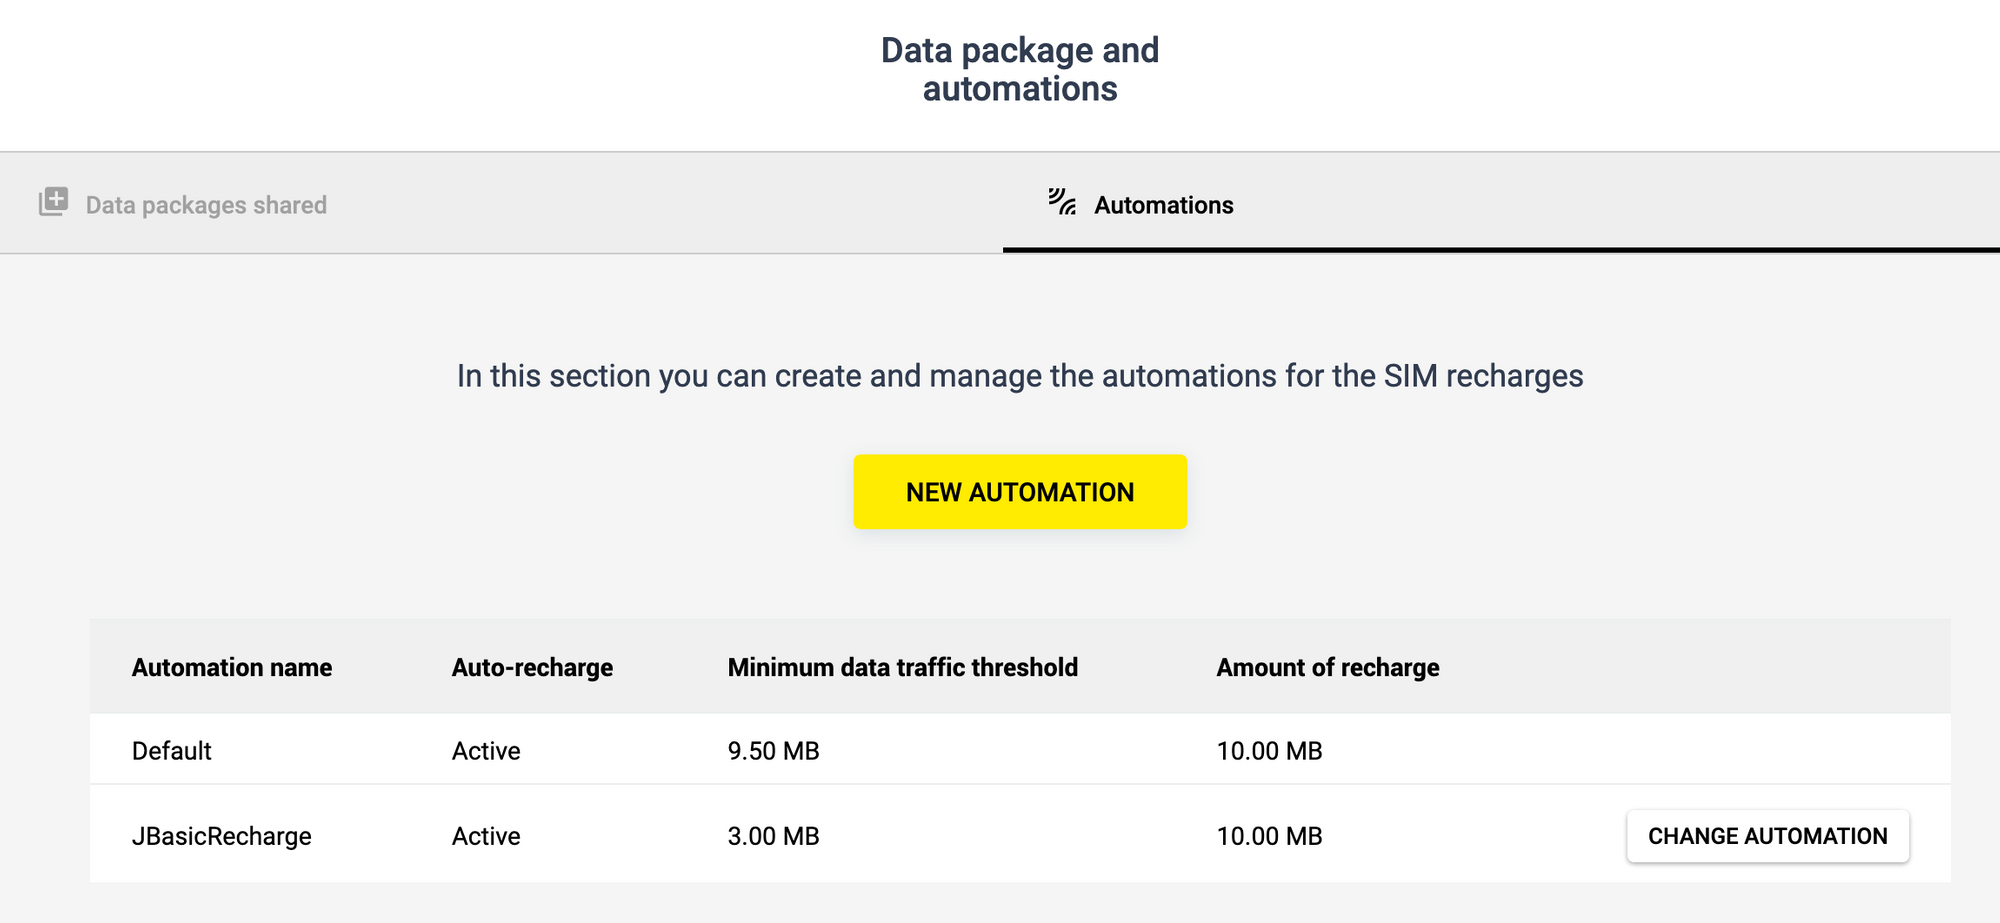
During activation, you'll be asked to set up an 'automation'. This is required by TM to ensure your SIM has valid credit available for use.
On my set up, I set my own automation which basically disabled auto-topic - this resulted in the SIM blocking itself every time it activated! Don't do this!
If you want to avoid the default automation (10MB of data when less than 9.50MB remaining), set up your own automation that will top up when you have something like 3MB remaining - like below;
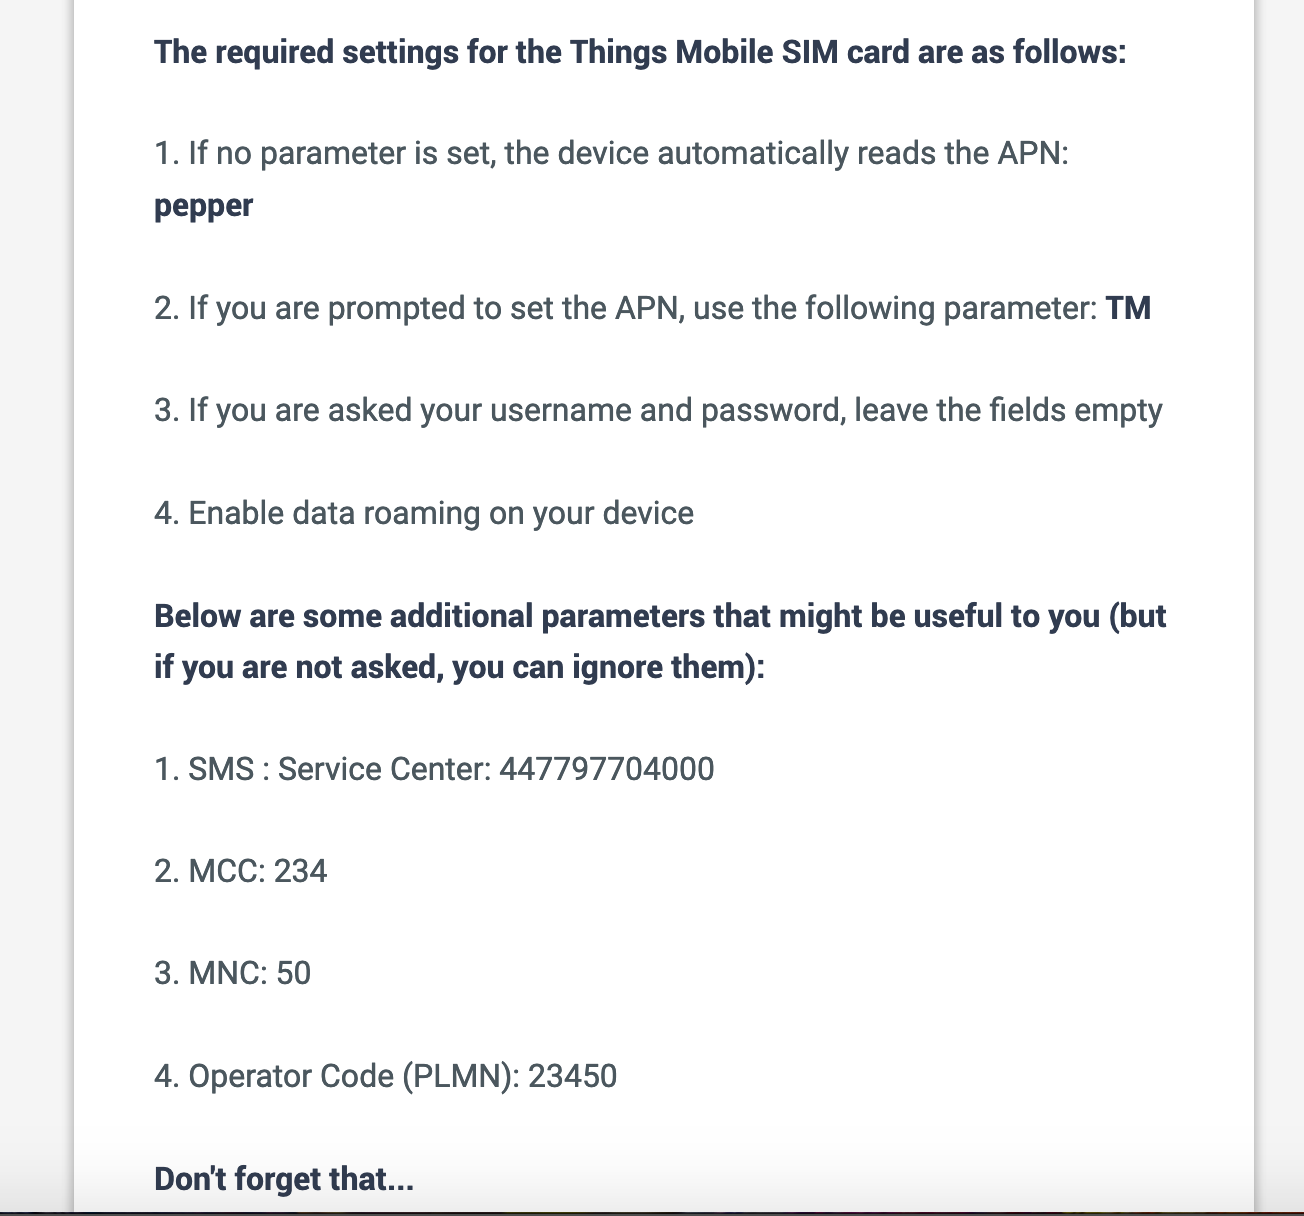
Once everything is done, you'll be given some information that will come in handy later, like the APN and any credentials (there are none!)
Tracker
Now is a good time to unbox the tracker and get sorted with the rats-nest of wires that come with it.
I removed the wire attached to the relay (wasn't going to use it and it's an unnecessary attachment for me).
I tidied up the rest of the wires and kept the three I needed - I use +12V, Ground & ACC. You can also pop in the SIM card now.
The tracker requires a permanent supply of 12V, which will keep the internal battery fully charged. My current clamp isn't accurate enough to measure the 'sleep' current of the tracker, but it's less than 0.1A (@12.5V) when actively transmitting.
The ACC wire should be connected to a 12V line that is live when the engine is running. This might be the supply to a 12V socket in the car, the supply to the radio, interior lighting supply - just something that is off when the ignition isn't on.
To test out the tracker before installation, connect the +12V and ground to a power supply. The GPS antenna (the 'pod' shape one with the magnetic base) & GSM antenna (the double-prong one with tape on the back) can be connected to the tracker for testing, too.
Once the tracker gets a GPS lock, the green light will illuminate. The LED will also flash once a second, indicating it has a GSM singal too. We'll come back to configure the tracker once we have installed Traccar.
Software / VPS
It would be best for your server to have a static IP, otherwise you'll need to change the IP on all the trackers every time the IP changes - some trackers may allow a DNS lookup - meaning you could use a Dynamic DNS name, but I haven't tested it. Check your hardware for compatibility. This will also use a small amount of mobile data during the DNS lookup.
Installing Traccar is pretty easy, though the documentation isn't the easiest to find or navigate. If installing Traccar on a VPS, the following link is helpful;
While these instructions are for Digital Ocean, the instructions are similar for Oracle Cloud.
It's worth noting that Traccar can also be run using Docker, but my attempt at running it wasn't as stable as a conventional install.
While running the commands listed in the above link, be sure to download the latest version of Traccar as you go.
To change the web access port for your installation, you can include the line below in your traccar.xml file - I left mine at the default (8082) and used my Caddy proxy to access my tracker from a subdomain on my network. More on this to follow.
<entry key='web.port'>80</entry>Once the instructions above are followed, you should be able to check that the Traccar service is up and running;
systemctl status traccarYou likely won't be able to access your Traccar server yet as the firewall rules haven't been created. Keep reading!
Traccar uses a large number of ports for communications with trackers. This is best explained by showing you the supported devices list. Each tracker protocol is programmed into Traccar separately, and each is identified by a different port number. Initially this means you might need to test a few different ports, but once configured, you can close all the unnecessary ports again. It turns out my tracker needs port 5001, but yours may be different.
Firewall Ports
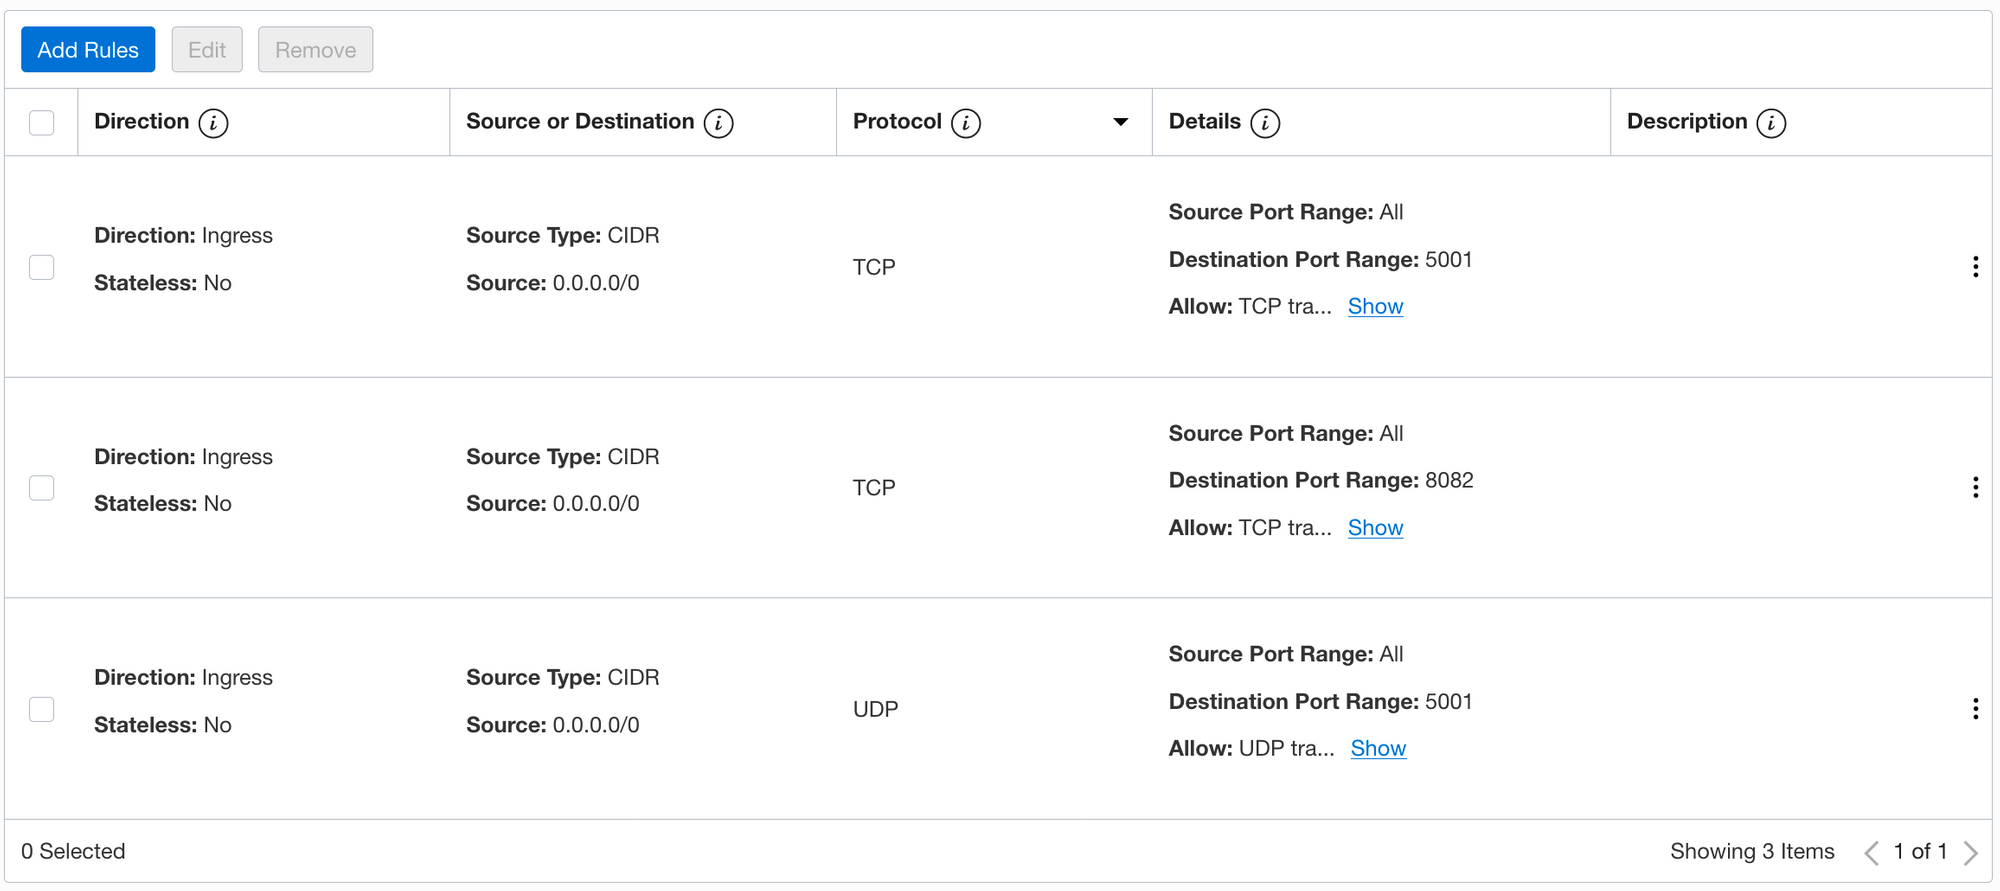
To get us ready for testing, we'll unblock ports 5000-5150 (TCP & UDP) and 8082 (TCP).
To start, visit your VPS provider portal. For me, it's the Oracle Cloud interface. We need to add a Security Group.
To get us started with firewall rules, you'll want three rules.
- Ingress > Source CIDR (0.0.0.0/0) > TCP > Source Range (Blank) > Dest (8082)
- Ingress > Source CIDR (0.0.0.0/0) > TCP > Source Range (Blank) > Dest (5000-5150)
- Ingress > Source CIDR (0.0.0.0/0) > UDP > Source Range (Blank) > Dest (5000-5150)
Now, we'll want to open the ports on the virtual machine. To save us from altering IP Tables, we'll use firewalld. Chances are it won't be installed, so you'll need to install it;
sudo apt-get install firewalldTo configure firewalld, we'll need to use firewall-cmd - don't forget to add SSH too! Commands below includes port 8082, but you may need to change this if you altered the web port above.
sudo firewall-cmd --add-port=22/tcp --permanent
sudo firewall-cmd --add-port=8082/tcp --permanent
sudo firewall-cmd --add-port=5000-5150/tcp --permanent
sudo firewall-cmd --add-port=5000-5150/udp --permanent
sudo firewall-cmd --reload
sudo firewall-cmd --list-all
At this stage, the ports should be open and ready to accept connections. Visit the IP address issued by your provider and make sure you can access Traccar.
DNS & Reverse Proxy
If you own a domain name, you might consider adding a DNS record to your Traccar instance for accessing it from outside your network - like tracker.tld.com. Remember some ad-blockers might try and block a domain containing the word 'track', so a random word might clear filters a bit better.
I also put the public access link behind my reverse proxy. This means I don't need to get users to enter the port number (IP:8082) when visiting the tracker site, instead they just go to the sub-domain. This requires extra configuration, but it looks a lot more professional.
The following Caddy configuration will proxy connection requests for 'tracker.xga.ie' to port 8082, and will push web-sockets. These are required for the Traccar interface.
tracker.xga.ie {
        gzip
        proxy / http://127.0.0.1:8082 {
                websocket
                insecure_skip_verify
                transparent
        }
}Configuring the tracker & Adding to Traccar
A challenge of using Things Mobile is that the mobile number is not European, but Things Mobile have a great way of dealing with this - their SMS portal. It's possible to send SMS messages to the tracker for only €0.03, so configuring the device doesn't cost a lot. When I set my account up, I received a few 'residual' free texts - so most of the configuration was free.
When a messge is sent to the tracker, it should reply - you can view the replies in the TM SMS portal (occasionally with a little delay).
I used the following sequence of commands to get the TK103 tracker running - note the default password of 123456 and the position of the spaces (or no spaces);
begin123456
APN123456 TM
adminip123456 140.140.140.10 5001
gprs123456
fix060s***n123456
less gprs123456 on
The commands do the following;
- Begin: Initialise the tracker
- APN: Set the APN to TM (for Things Mobile)
- AdminIP: This is to set the IP of Traccar, my example is 140.140.140.10 (not the real IP!). I use port 5001, per the list here. For a clone tracker, you may need to try different port combinations.
- GPRS: Enables GPRS mode (requires the APN to be set).
- Fix060S***: This allows the Tracker to send a fix every 60 seconds, with the s*** meaning it's allowed to send continuously.
- Less GPRS: Less GPRS will set the tracker to standby 10 mins after the ACC cable stops receiveing power. This disconnects the GPRS will re-connect every few hours to check in, or will come live again when the ACC receives power.
Using the LESS GPRS command saves a significant amount of data and should be used!
Once all of the commands are run, you should see a solid green light (for GPS) and a red blink every 3 seconds. A blink every 3 seconds will indicate that GPRS is working.
To add the device to Traccar, you'll need to check the logs for the IMEI number of the device. Logs are located in '/opt/traccar/logs'. Inside the log file, you'll find lines of code which includes the IMEI.
The tracker can then be added to Traccar using the plus symbol in the Devices tab.
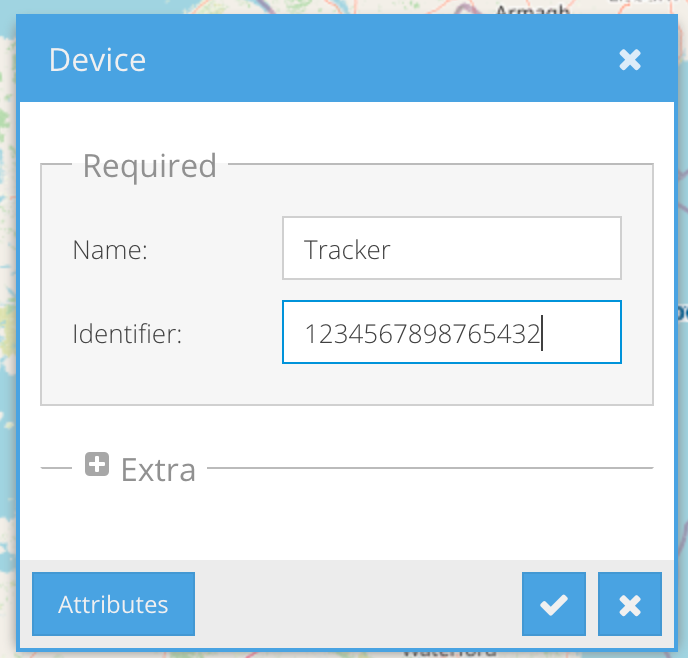
Once the tracker is added, it should appear on the map!
Installing the tracker
I recommend completing all the above steps first - there's no point installing the tracker in the car until you have the bench setup complete and know everything is working!
When installing the tracker in your vehicle, I recommend using fuses on the +12V and ACC lines. This will prevent faults in your tracker causing your battery to short circuit or overheat, potentially burning out the car! Keep it safe and use appropriate fuses for the cable size used on your tracker.
A helpful method for wiring is to use fuse holders with spade connectors, meaning that any cut wires can be re-attached if you choose to remove the tracker in future - it's just like the original install (minus the spade connectors).
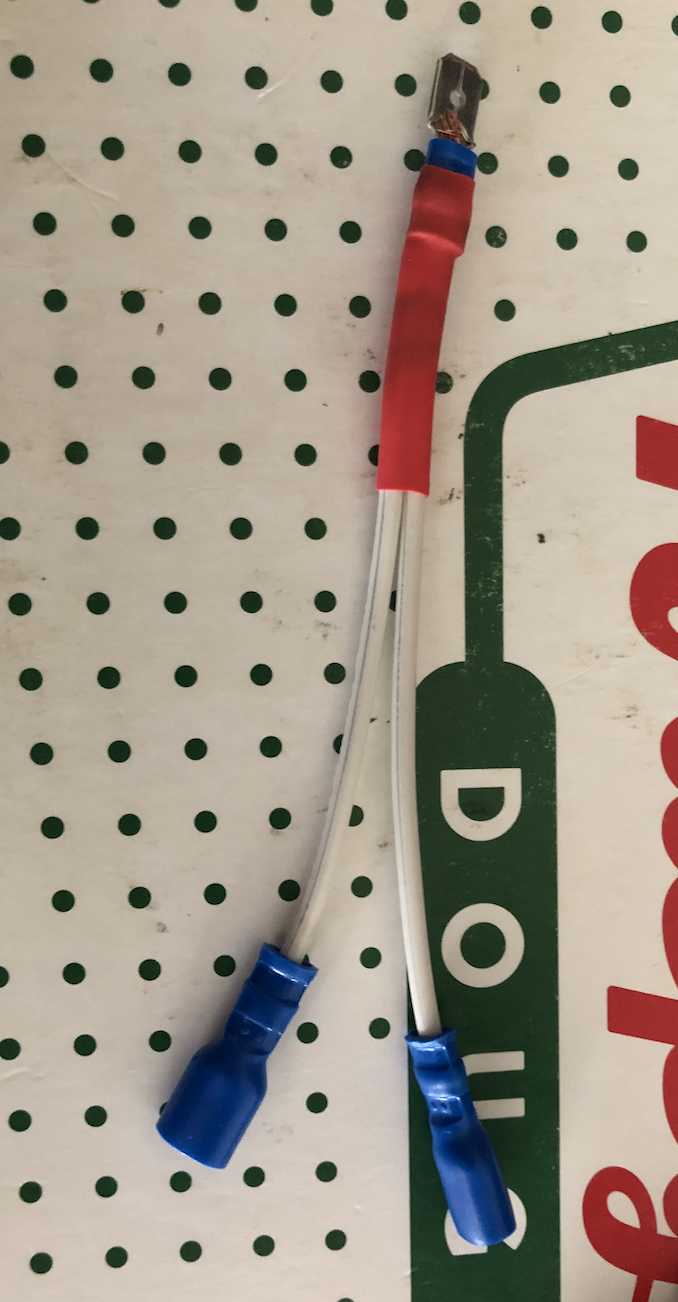

The connector on the left (marked with red heat-shrink) allows power in from a source, then two outputs - one to the original load it was supplying, plus one more for the tracker. On the right, you can see a mini-fuse holder with a male and female spade connector.
Remember to mount your tracker where it won't easily be found, and where a thief can't access easily. There are a few sites online that can give you suggestions thought they are typically small enough to allow you to be creative with where you place it.
To get the ignition (ACC) source, I normally head towards the radio power, backlight supply (the lights that come on behind the knobs & buttons), or sunroof. These are normally off and have sufficient cable size / fuses to not cause issues with the tracker drawing a little extra power.
Integration with Home Assistant
It wouldn't be a real project without Home Assistant integration!
 Home Assistant
Setting up Traccar in Home Assistant is really simple... just add this to your configuration.yaml;
device_tracker:
  - platform: traccar
    host: traccar_IP_address
    username: traccar_username
    password: !secret traccar_pw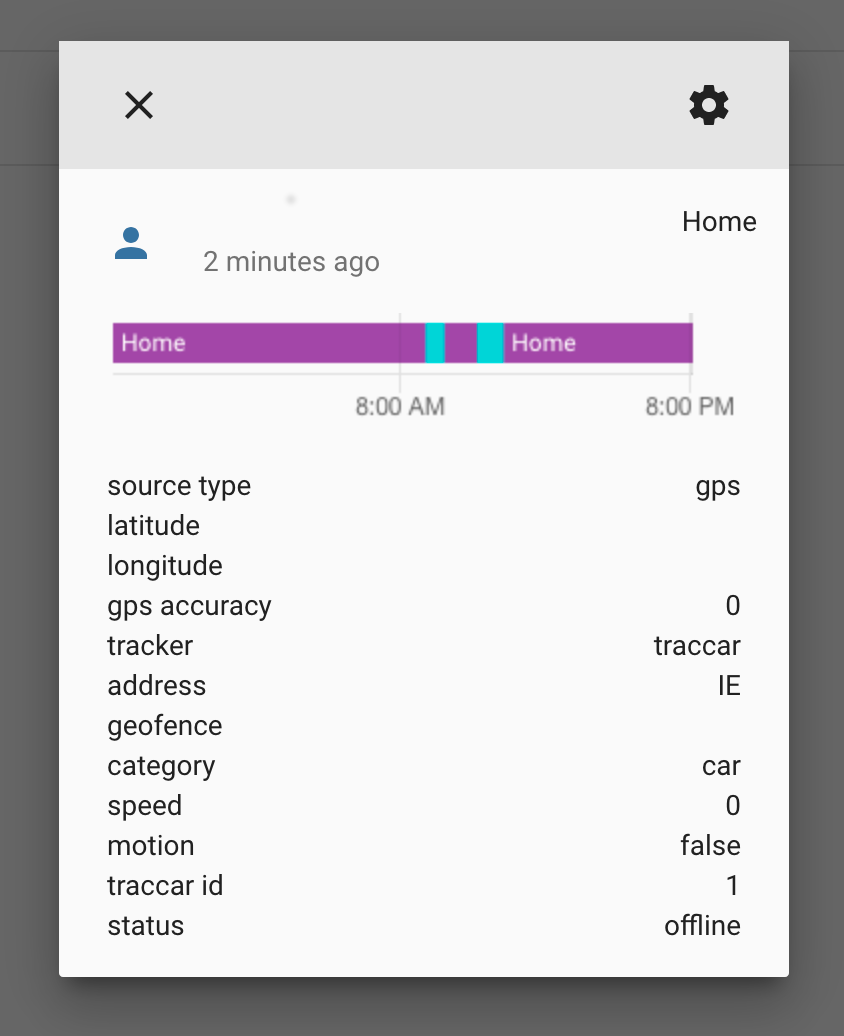
A quick reboot and you'll start getting data from Traccar in Home Assistant. This will give you the Lat / Long position, plus any Geo-fences that are configured in Traccar.
I find geo-fences really helpful as I have a Markdown card with the latest geofence triggered by the tracker!

If you want to try something similar to this, try this code;
{% if is_state('device_tracker.traccar_car', 'home') %}
## Car is at home!
{% else %}
## Car last Geo-Fence: {{ state_attr('device_tracker.traccar_car', 'geofence') }}.
{% endif %}Results
Installing Traccar and getting the commands right for these trackers can be tricky (especially with a user manual that has been poorly translated from Chinese - English) - hopefully this post has provided some assistance to you.
My original proof of concept has been proven in a couple of weeks of use; that there is a cost effective way of providing fleet tracking. Open Source software like Traccar (Apache 2.0 License) and low cost SIM cards from Things Mobile allows scaling of the system low cost and easily managed.
If you want to extend the use of Traccar, consider adding e-mail notifications and geo-coding.
E-Mail notifications could then be used to notify you of devices reaching high speeds or leaving geo-fenced areas.
Reverse Geo-coding will display the address of the vehicle in real-time - I use LocationIQ which is completely free and works very well. In the event of making this project commercial, I would have to sign up for a license, or consider hosting a service like Gisgraphy.
Hopefully this guide has been useful! If I have missed anything or you have any queries, please feel free to get in touch: hi@xga.ie