Chrony NTP Server ⏱
It is possible to set up an NTP server on a Raspberry Pi, allowing all of your devices to receive time with as small an offset as possible, and reducing load on NTP pool servers.

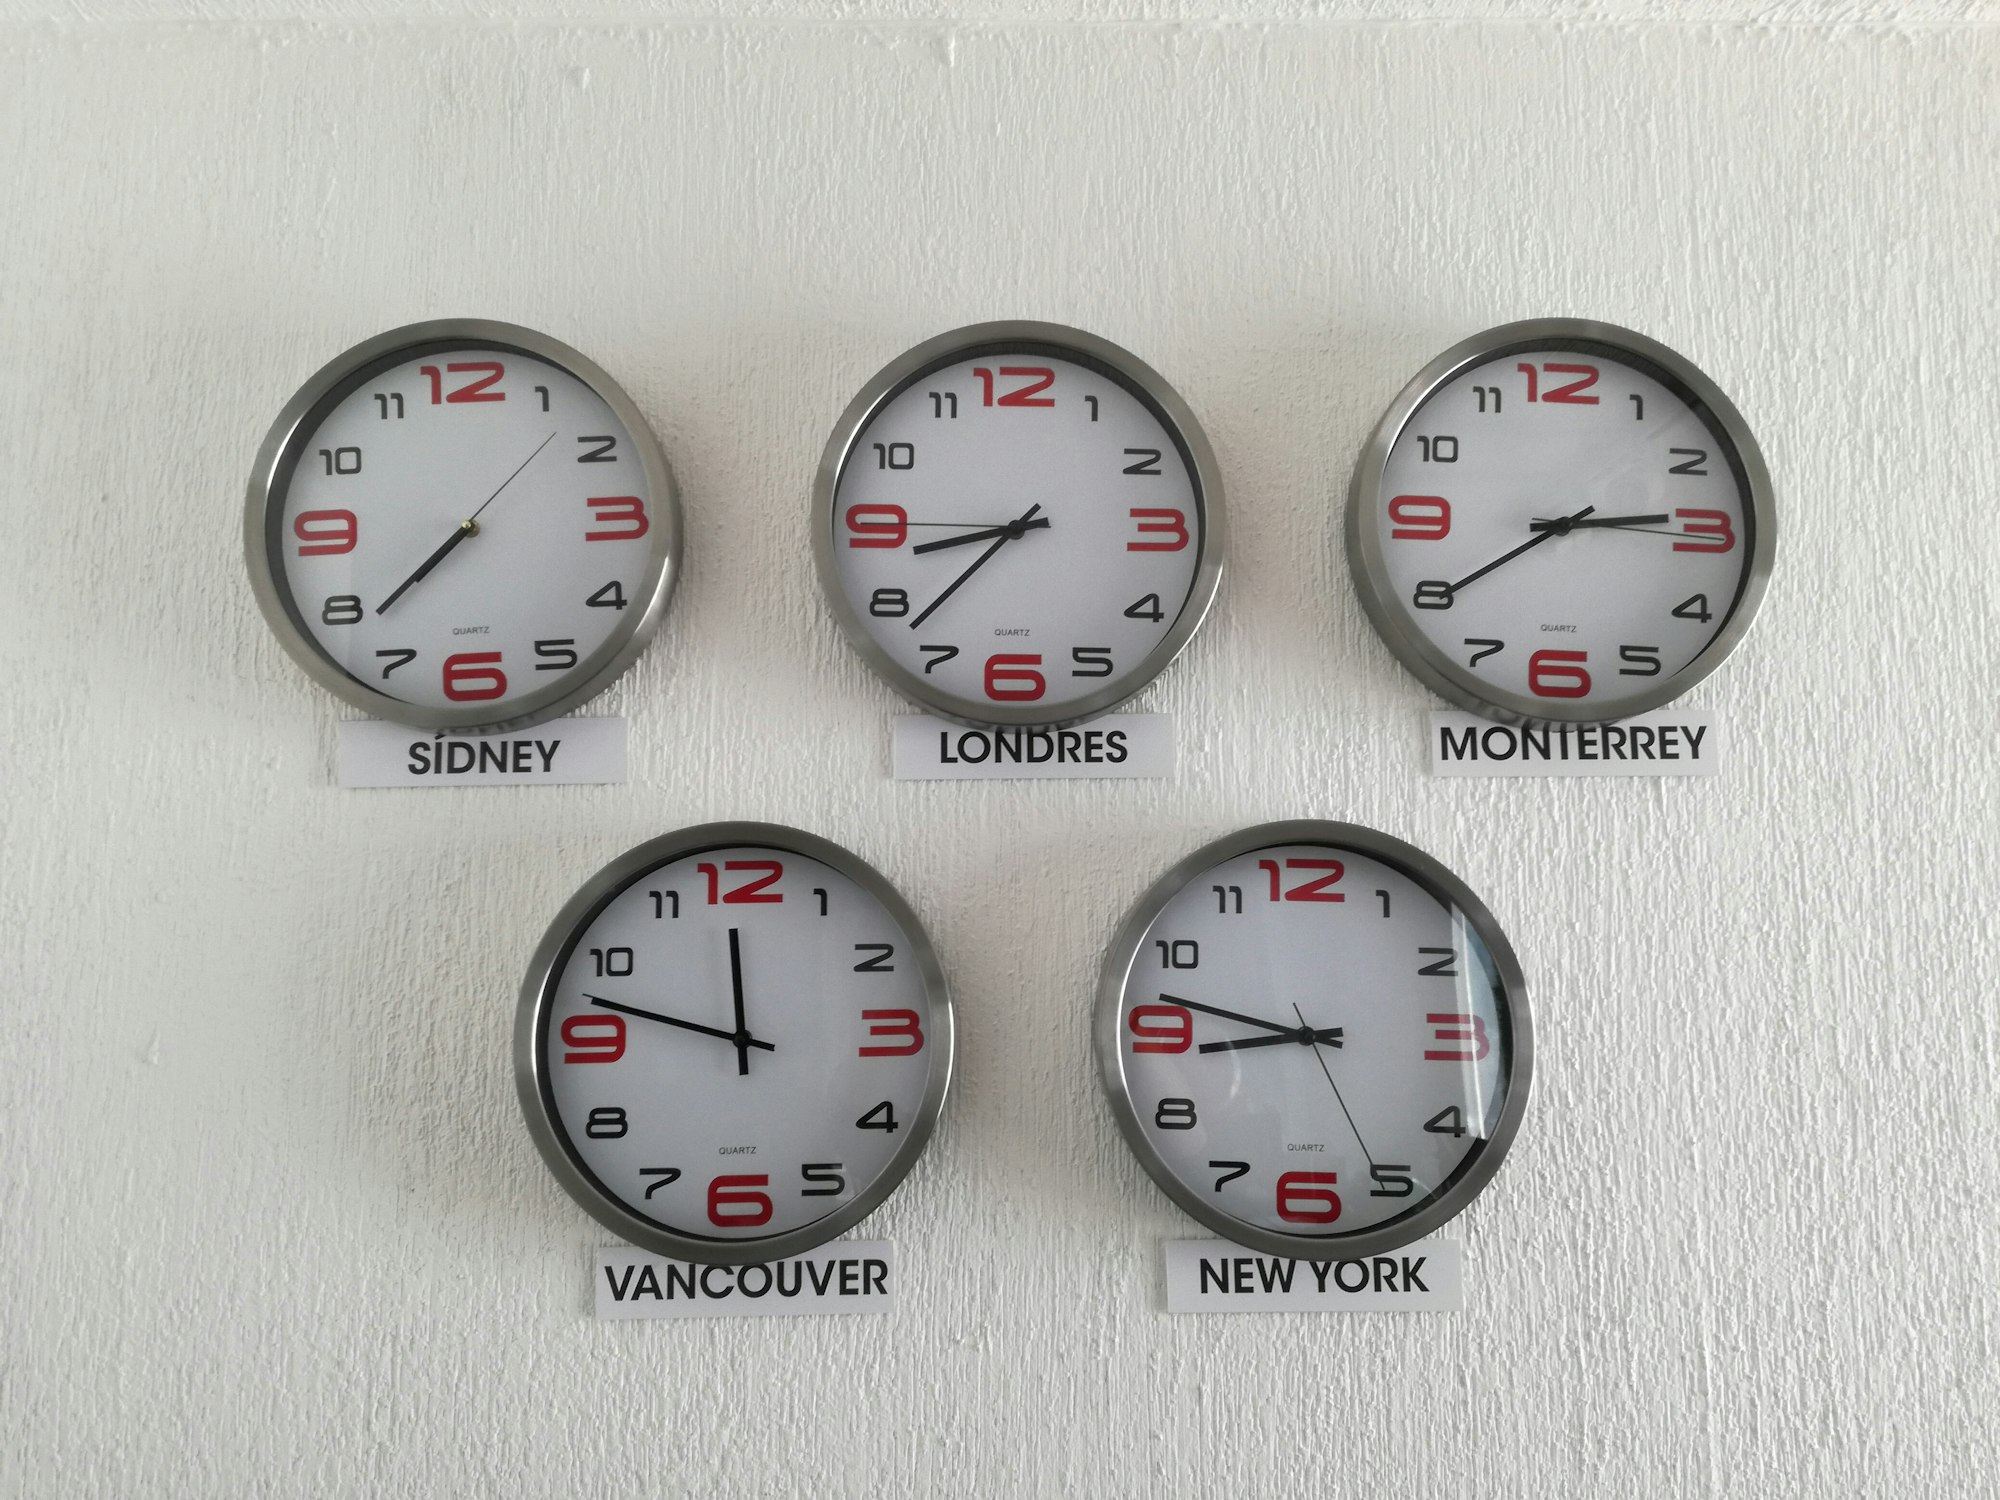
"A man with a watch knows what time it is. A man with two watches is never sure." Segal's Law
Network Time Protocol, or NTP, allows computing devices to synchronise time very accurately, often millisecond to nanosecond accuracy.
It is possible to set up an NTP server on a Raspberry Pi, allowing all of your devices to receive time with as small an offset as possible, and reducing load on NTP pool servers. It may also be useful if you have an intermittent internet connection.
My motivation to build a time server for the Lab was to ensure that all devices had a very accurate time (in the millisecond range at least) to assist with accurate log management. With the development of LogApp also on-going, accurate database transactions will become important for testing in the future.
The Raspberry Pi NTP server currently operating on my network handles approximately 87,000 requests per day and never breaks a sweat. A Pi might not be ideal for a data centre, but it's perfect for Lab use!
Stratum
NTP works on a hierarchy, which is known as 'stratum'. A reference clock is known as 'stratum 0' - these are high-precision clocks in GPS satellites or atomic clocks.
A receiver that pulls the time from a stratum 0 clock becomes 'stratum 1'. This continues as stratum +1 until stratum 16. As this number increases, time accuracy decreases. There are only a small numeber of stratum 1 servers in existance, as they need to obtain time from a stratum 0 source, but there are plenty of stratum 2 and below.
It is possible for systems of the same stratum to query & set time from each-other.
NTP Hardware
The XGA time server is using a Raspberry Pi with a GPS expansion board, made by Uputronics. This sits on top of the Pi and is connected to an external GPS antenna. There is a capacitor on top of the board which allows for quicker GPS signal locks following a system restart or power loss on the Pi.

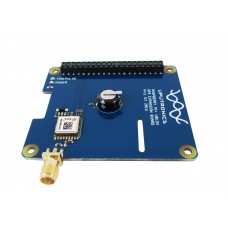
The circuit board provides a Pulse Per Second (PPS) output, which has really low jitter (jitter is a seeminly random time deviation). PPS comes in really helpful at disciplining our NTP software with an accurate pulse on the second.
I use a dedicated Raspberry Pi 3B for the NTP server, thus avoiding any heavy or dynamic loads on the system which could cause a reduction in accuracy of results for systems querying the NTP server.
I had tried a number of other smaller PCBs (NEO 6M & NEO 7M) with pin headers and built in antennas, but found the signal tended to be weak (drop-outs made them unsuitable), even when placed outdoors. In addition, the PPS seemed to be patchy, even with a solid GPS signal. With months of solid testing and use, I highly recommend the Uputronics board.
Setting up the Pi
There are many guides available for setting up an NTP server on a Pi, so I won't repeat them, but I will give some guidance on where I had issues (keep reading for an example of an excellent guide by Gary Miller).
Power supplies are very important for the Raspberry Pi - this application is no different. A clean power supply of at least 2.5 Amps is recommended. I find with the Pi there are fewer crashes and therefore fewer SD card issues when using a properly rated power supply.
NTP operates by calculating round-trip delay, so utilising ethernet may provide a lower latency and more reliable connection than WiFi, creating a better experience for critical clients.
Once the board is installed and configured, running 'gpsmon' provides information from the GPS module. A stream of text will appear at the bottom of the terminal, this is the data from the GPS module. Every second you should see 'PPS offset', indicating a good PPS signal.
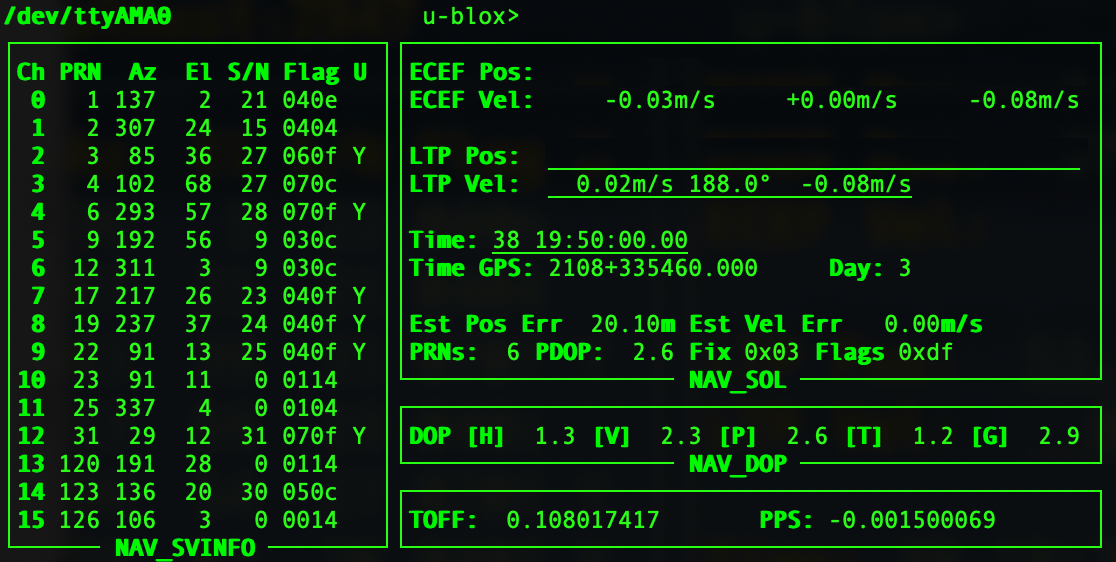
On the left, you will see the satellites the module is currently locked to (in this case, it's receiving a signal from 16 different GPS satellites, but using only 6). On the top right of the monitor, it will display the position of the receiver (removed in this image). GPS time is indicated on the display, but due to leap seconds this time is likely different to 'real' time.
If you are having issues with PPS, running 'sudo ppstest /dev/pps0' will print a line of code every time a pulse is received by the Pi. This is helpful for ensuring the PPS is configured correctly.
If you don't see lines every second, try moving the GPS antenna to get better visibility of the sky. PPS will only work when a valid GPS signal is received.
Chrony, Config & Offset
Firstly, why Chrony and not NTPd?
Research suggests that Chrony is more accurate than NTPd and uses fewer system resources. It also handles leap seconds very nicely. Facebook Engineering provide a great write up on the difference;
 Oleg Obleukhov
As I mentioned above, there are a lot of resources for running your own NTP server. Gary Miller provides fantastic documentation on setting up a Chrony server;
When the server is set up, the offset may need to be altered. It is advisable to use at least 4 other servers to compare time (remember Segal's law?). The mean offset can be added or removed from the NTP server time to make ensure it is accurate. Details can be found in the link above.
It is possible to obtain the IP addresses of 'pooled' servers by using the dig command. The IP addresses listed are four NTP servers in the pool requested.
You can change the 'ie' to your country code for local servers!
$ dig ie.pool.ntp.org

;; ANSWER SECTION:
ie.pool.ntp.org.	50	IN	A	162.159.200.1
ie.pool.ntp.org.	50	IN	A	85.91.1.180
ie.pool.ntp.org.	50	IN	A	162.159.200.123
ie.pool.ntp.org.	50	IN	A	188.125.64.6
If you wish you use Stratum 1 servers, you may find a list here;
http://support.ntp.org/bin/view/Servers/StratumOneTimeServers
Use of Stratum 1 servers may not always be necessary; your time server will be Stratum 1 itself when using a Stratum 0 authoritative source (GPS in our case).
Additionally, as you'll see in the next section, some providers like Google or Apple provide Stratum 1 servers.
Test commands
ntpdate -q time.google.com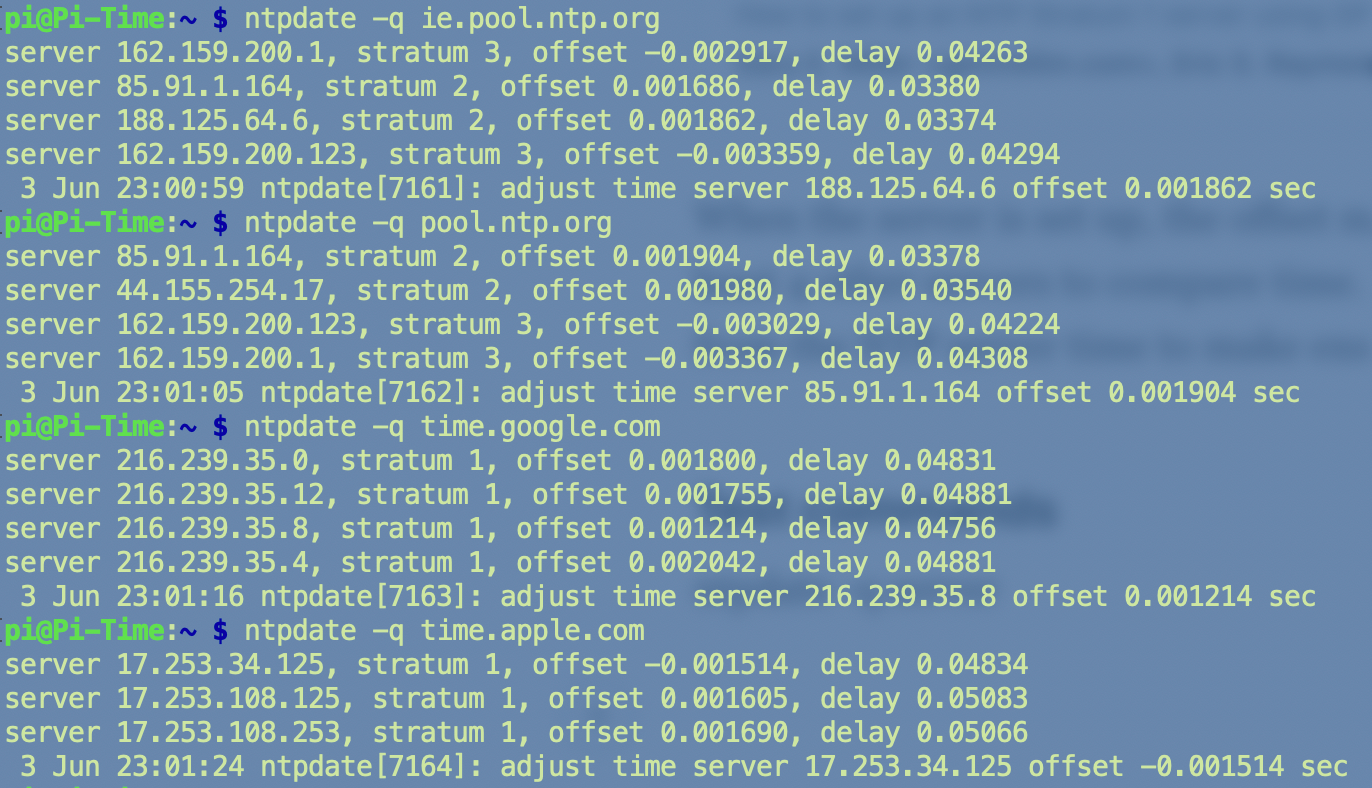
The measured offset of system time vs remote server time is within +/- 0.002 of a second.
'chronyc' will provide information directly from Chrony daemon.
sudo chronyc clients
This will list all clients that have requested NTP data, along with other debugging information (hostname, packets receved, packets dropped to limit response rate, avg interval between packets, time since last packet, etc).
chronyc tracking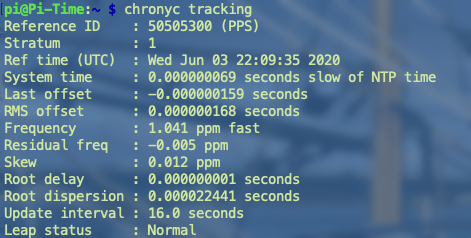
Tracking information provides details from the daemon. System time is pretty close to NTP time!
chronyc sourcestatsSource stats include GPS / PPS and other sources provided to Chrony, this is really helpful for debugging.
chronyc sourcesSources is a display you may be more familiar with if you have used NTPd in the past.
This displays the sources used by Chrony to provide system time, stratum of that source, 'reach' (incremented to 377 - so if the source is reachable all of the time, you will see a value of 377. If it's lower, you should investigate why the source cannot be reached).
The most interesting part lies at the right hand side of the output. The number in brackets shows the offset between system time and measured time. This may be in as low a scale as nanosecond accuracy. On our device, PPS currently displays +115ns (running fast by 0.000000115 of a second).
On the far right of the line, '+/-' is displayed - this is the margin of error in the measurement. In my case, I see PPS is currently +/- 105ns, with the GPS +/- 100ms.
Output of Statistics
I use MQTT frequently to provide information from systems into Home Assistant, our NTP server is no different!
A cronjob runs every 20 minutes, uploading some stats which I can use to track the server.
Logging and tracking of lab systems properly is on the to-do list!
#!/bin/bash

reqs=$(sudo chronyc clients | awk '{sum+=$2} END {print sum}')
mqtt pub -h 10.10.10.10 -u user -pw password -t nodePiNTP/requests -m "$reqs"

clients=$(sudo chronyc clients | awk 'END { print NR-2 }')
mqtt pub -h 10.10.10.10 -u user -pw password -t nodePiNTP/clients -m "$clients"

stratum=$(sudo chronyc tracking | awk '{if(NR==2) print $3}')
mqtt pub -h 10.10.10.10 -u user -pw password -t nodePiNTP/stratum -m "$stratum"

ppsoffset=$(sudo chronyc sourcestats | awk '{if(NR==5) print $7}')
ppsoffset_formatted=$(echo $ppsoffset | cut -c 1-$((${#ppsoffset}-2)))
mqtt pub -h 10.10.10.10 -u user -pw password -t nodePiNTP/ppsoffset -m "$ppsoffset_formatted"

ppsreach=$(sudo chronyc sources | awk '{if(NR==5) print $5}')
mqtt pub -h 10.10.10.10 -u user -pw password -t nodePiNTP/ppsreach -m "$ppsreach"To use this template, you will need to install the MQTT Command Line Interpreter on your server and edit the IP, username & password above.
This will send the number of clients, the PPS offset, PPS reach, NTP requests & Stratum. This provides a high level overview of the server.
This file can be made executable (chmod +x chrony-cron.sh) and added to the root user crontab:
*/20 * * * * sudo sh /root/chrony-cron.shNetworking Changes
Finally, once you have your NTP server running, you might choose to force your network users to use your server. This minimises reliance and load on third party servers, as only one system (your NTP server) will be connecting out for time information.
DHCP opt 42
Option 42 provides an NTP server to DHCP clients. This is helpful as it minimses the requirement to set the NTP server manually on clients. The UniFi controller has this feature listed in Settings > Networks > Edit Network > Advanced DHCP Options:

NAT rule
You may find that some clients ignore the DHCP opt 42 issued by your router. In this case, you may want to add a NAT rule.
If you are using UniFi equipment, you can set a NAT rule as follows.
- Edit the file /usr/lib/unifi/data/sites/default/config.gateway.json on your UniFi Controller (this file may not exist)
Adding the file on the USG will cause it to be removed the next time the device provisions. - Add the following;
{
	"service": {
		"nat": {
			"rule": {
				"1": {
					"description": "Redirect NTP reqs LAN",
					"destination": {
						"port": "123"
					},
					"inbound-interface": "eth1",
					"inside-address": {
						"address": "192.168.1.100",
						"port": "123"
					},
					"source": {
						"address": "!192.168.1.100"
					},
					"log": "disable",
					"protocol": "udp",
					"type": "destination"
				},
				"2": {
					"description": "Redirect NTP reqs IoT",
					"destination": {
						"port": "123"
					},
					"inbound-interface": "eth1.3",
					"inside-address": {
						"address": "192.168.1.100",
						"port": "123"
					},
					"source": {
						"address": "!192.168.1.100"
					},
					"log": "disable",
					"protocol": "udp",
					"type": "destination"
				},
				"6001": {
					"description": "MASQ NTP requests LAN",
					"destination": {
						"address": "192.168.1.100",
						"port": "123"
					},
					"log": "disable",
					"outbound-interface": "eth1",
					"protocol": "udp",
					"type": "masquerade"
				},
				"6002": {
					"description": "MASQ NTP requests IoT",
					"destination": {
						"address": "192.168.1.100",
						"port": "123"
					},
					"log": "disable",
					"outbound-interface": "eth1.3",
					"protocol": "udp",
					"type": "masquerade"
				}
			}
		}
	}
}
Always validate JSON before saving: https://jsonlint.com/
Failure to do so and uploading invalid code will put your USG in a provisioning loop (it can be fixed, but what a waste of time)!
These rules redirect all traffic on port 123 (that doesn't orginiate on 192.168.1.100) to the IP 192.168.1.100.
By ignoring the IP 192.168.1.100, it will allow that IP to route out on port 123, allowing connections to external NTP servers.
You can find the interface name by typing 'show interfaces' in the terminal.
Additionally, you can see NAT rules by typing 'show nat rules'.
DNS rule
Finally, you might consider adding a DNS entry for your time server (within your network). If you have a PiHole v5 set up, you can use 'Local DNS records' to forward 'time.your.tld' to your NTP server IP address.
I do not have the NTP server exposed outside of my network, but there is plenty of reading material online for such a setup.
Summary
Hopefully this post has provided some food for thought for running your own NTP server, or helps you fix a problem you may be facing. As always, get in touch with queries or suggestions: hi@xga.ie